16 December 2009

Jasper Reports - Tricks and Tips

In the previous article, we modifed the rights to a set of Jasper Server reports.

To finish this set of articles, here are some tricks and tips.

Tomcat Server

It is possible to display the SQL used, along with its parameters by modifying the logging parameters in Tomcat. You need to modify the file:

C:\Program Files\jasperserver-3.5.0\apache-tomcat\webapps\jasperserver\WEB-INF\log4j.properties

# Global logging configuration
log4j.rootLogger=WARN, stdout, fileout
Change the WARN to DEBUG.

Calculated parameters

You can use calculated parameters. If you uncheck the ‘Use as a prompt’ checkbox, then you can enter an expression in the property Default Value Expression, such as:
"%" + $P{nom} + "%"
This is a JAVA expression.

To do the same thing in the XML view:
<parameter name="name" class="java.lang.String"/>
<parameter name="name_percent" class="java.lang.String" isForPrompting="false">
<defaultValueExpression>
<![CDATA["%" + $P{name} + "%"]]>
</defaultValueExpression>
</parameter>

For example, if you want to use a user-entered string as a LIKE in SQL, you could add ‘%’ at the end of the string:

<parameter name="name" class="java.lang.String"/>
<parameter name="name_percent" class="java.lang.String" isForPrompting="false">
<defaultValueExpression>
<![CDATA[
($P{name} == null) ? "%" : ("" + $P{name} + "%")
]]>
</defaultValueExpression>
</parameter>
<queryString language="SQL">
<![CDATA[
select * from INFORMATION_SCHEMA.TABLES WHERE table_name LIKE $P{name_percent}
]]>
</queryString>

Optional parameters

You can mark a parameter as obligatory or optional. If a parameter is optional, it is possible that the value be NULL in the report (rather than an empty string), so you need to protect all references to the value:

($P{name} == null) ? "%" : ("" + $P{name} + "%")


Also, if you try to dereference a parameter which has a value of null, you will get a NullPointerException, which is internally handled by JasperReports. This will result in a "null" string being displayed in place of the entire expression, or if the expression is part of the SQL select statement, an empty report.

So, for the expression : "front" + $P{name}.toString() + "back", if the value of $P{name} is NULL, then the text that will be displayed will be "null" NOT "frontnullback"

This is the last article in the Jasper Reports series. Hope this has been of use.

Jasper Reports - User rights

In the previous article, we added input parameters to a Jasper Server report.

This time, we'll look at how to modify user access rights to a report or set of reports.

The server administrator can change the rights for the directories and for the reports. They can also change the rights to see the other objects stored on the server, such as the data sources.

For example, for the reports, if you right click on the report on the website, you can select Assign Permissions:

jasper server menu option to change user permissions

Which displays a page where you can modify the permissions by either role or user:

jasper server change user rights

For the directories:

jasper server icon to change the permissions on a directory

Next time we'll look at some tricks and tips for Jasper Server Reports. Next>>

Jasper Reports - Parameterisation of reports

In the previous article, we updated an existing report on a Jasper Server.

This time, we'll look at how to define user-entered parameters for a report.

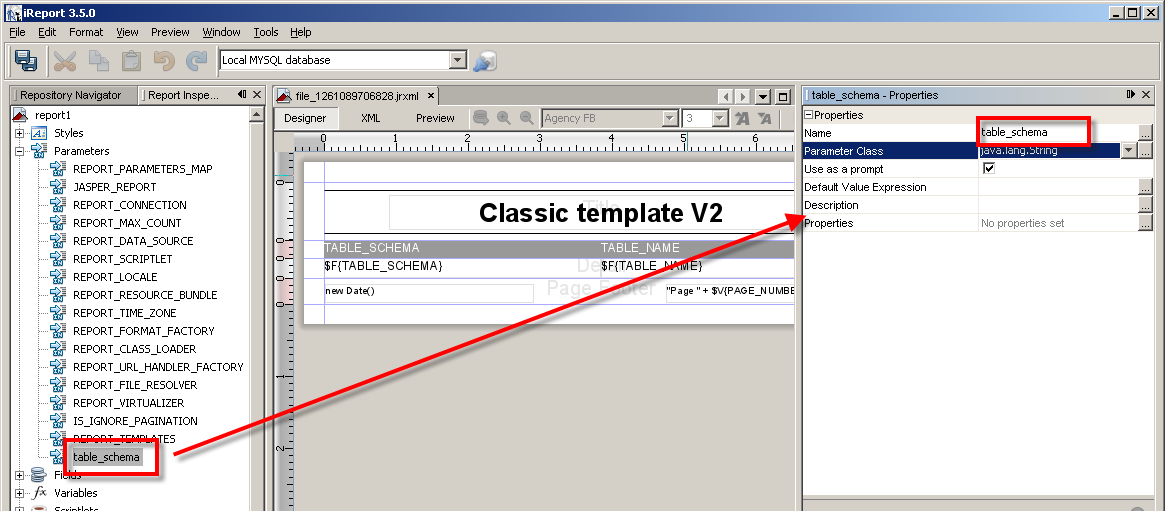
To define a set of parameters for a report, you can add parameters using the Report Inspector:

jasper reports add parameter to report

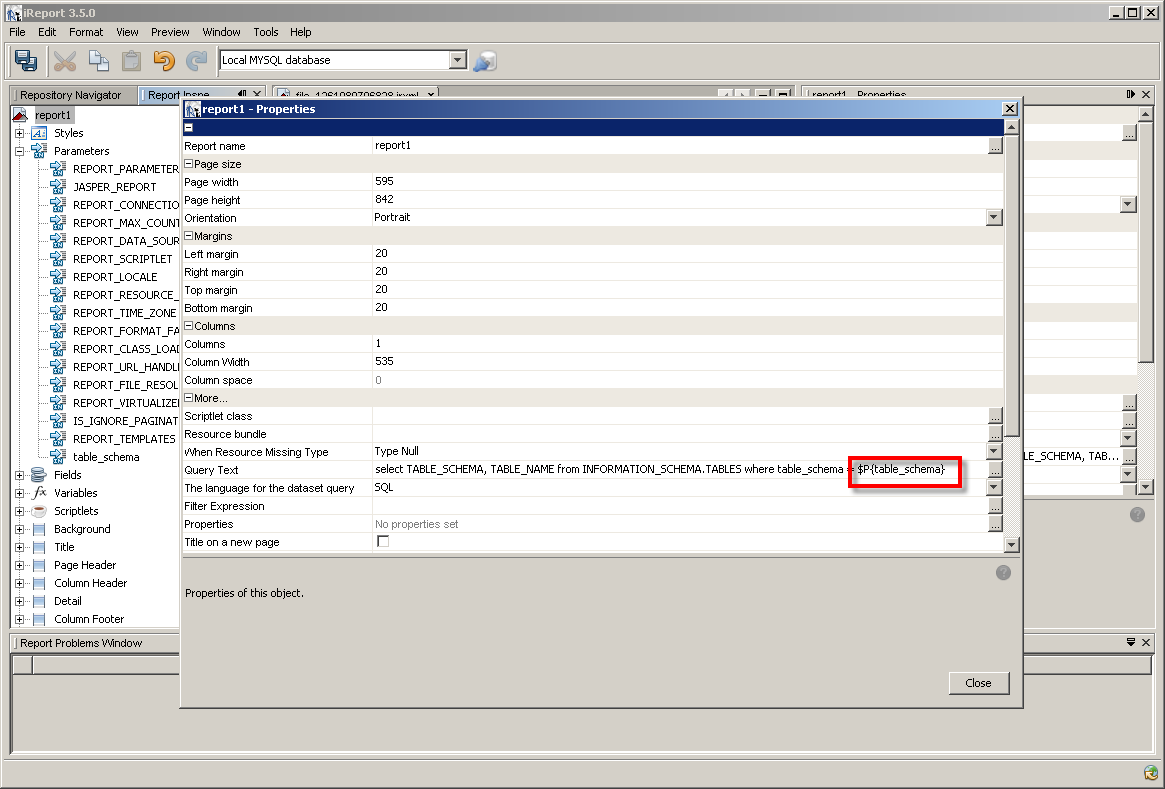
You can define the default values for a report. Once you’ve defined a parameter, you can reuse this elsewhere, for example in the SQL for a report:

jasper reports use parameter in query string

You reference the parameters using $P{name}, in this case $P{table_schema}.

Using this, you can filter the output of a report. But to use them, you need to specify how the user enters them. The entry of values isn’t done in the report, but in the Report Unit. You need to define Report Unit Input Controls.

You can define an Input Control so that the user can specify a parameter for a report. For the report defined previously, you could specify a value for the table_schema.
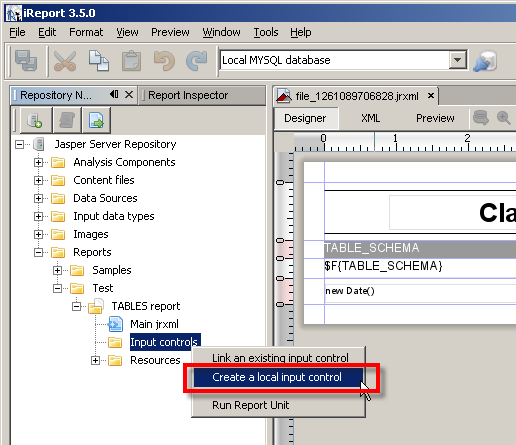
In the Report Unit, create an Input Control:

jasper reports add input control

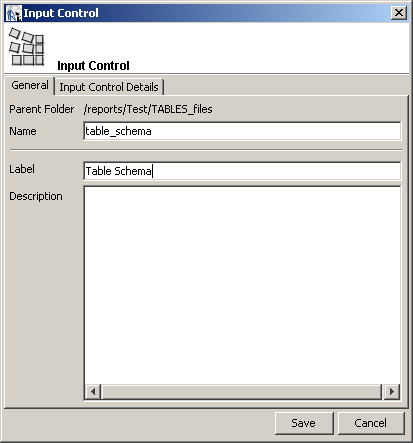
Enter the Name and Label :

jasper reports enter input control name

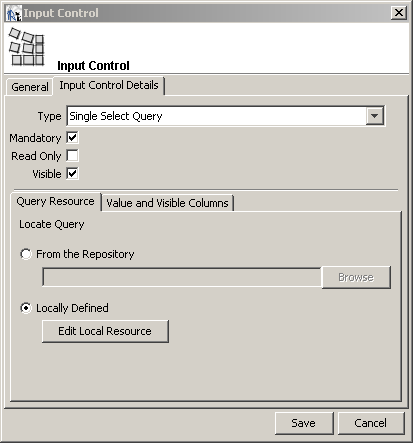
The label will be visible to the user. You need to define the details in the tab Input Control Details. For a list of items from the database, use Single Select Query. You can mark the value as mandatory as well here.

jasper reports input control details

To define the SQL statement, click on the Edit Local Resource button:
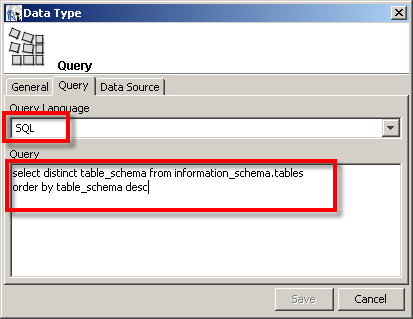
You'll need to enter a name and label for the local resource (table_schema/table_schema), and then click on the Query tab to define the SQL:

jasper reports define SQL for input control

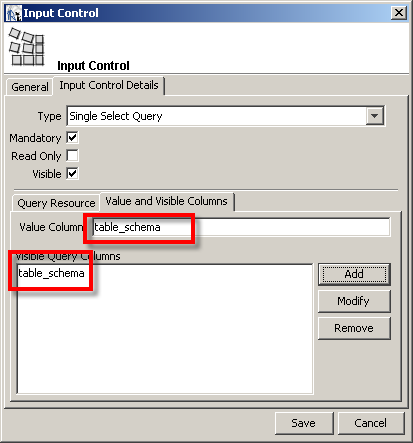
If you select a data source of 'None', the data source used will be that defined for the Report Unit. In the tab Value and Visible Columns, you need to define the value which will be passed to the report, and the columns visible which will be displayed to the user:

jasper reports input control columns

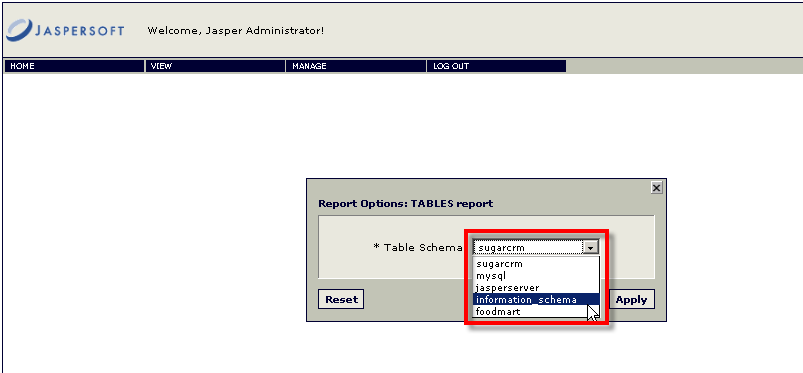
After deploying to the server, when you run the report the web site will display a input page.

jasper reports show input control on server

And the report displays the information for the table schema chosen.

jasper reports filtered report


Next we'll look at how to modify the user rights for the reports and other objects on Jasper Server. Next>>

Jasper Reports - How to update an existing Jasper Server report

In the previous article, we deployed a report to the Jasper Server.

This time, we'll update an already deployed report.

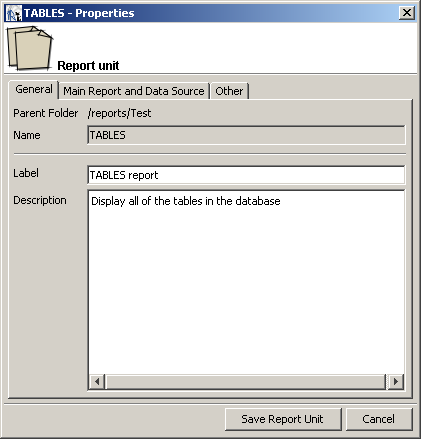
There are two parts to updating a report deployed to Jasper Server: You can update the properties of the Report Unit, and you can update the report itself. To update the properties of the Report Unit (the name, the description, the data source), you can right-click on the report and select Properties:

Jasper Reports report unit properties

Note that a change to the properties in the Report Unit is available immediately, as soon as you save the changes.

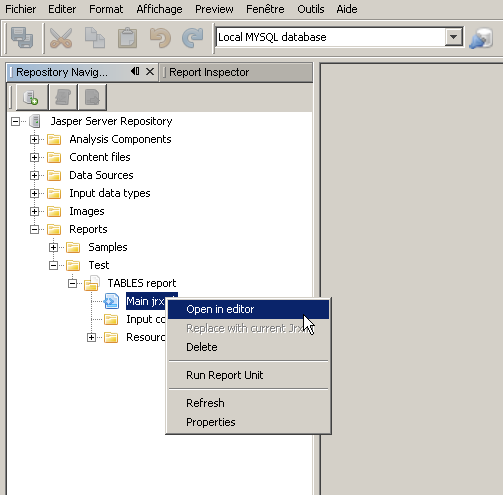
To update the definition of a report, the JRXML file, you need to right-click on the JRXML file for this Report Unit, and select Open in Editor:

jasper reports open jrxml in editor

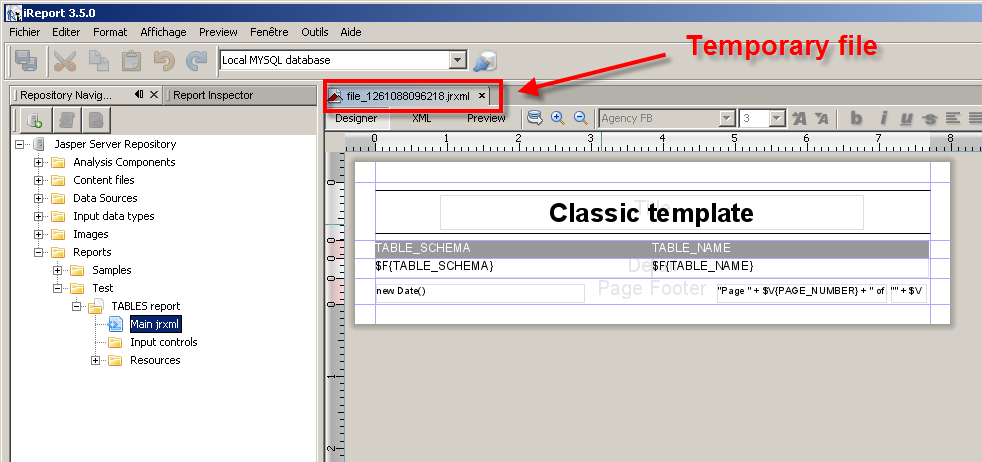
This creates a temporary jrxml file that you can edit:

jasper reports temporary jrxml file

You can make a modification and then save the file :

jasper reports changed file

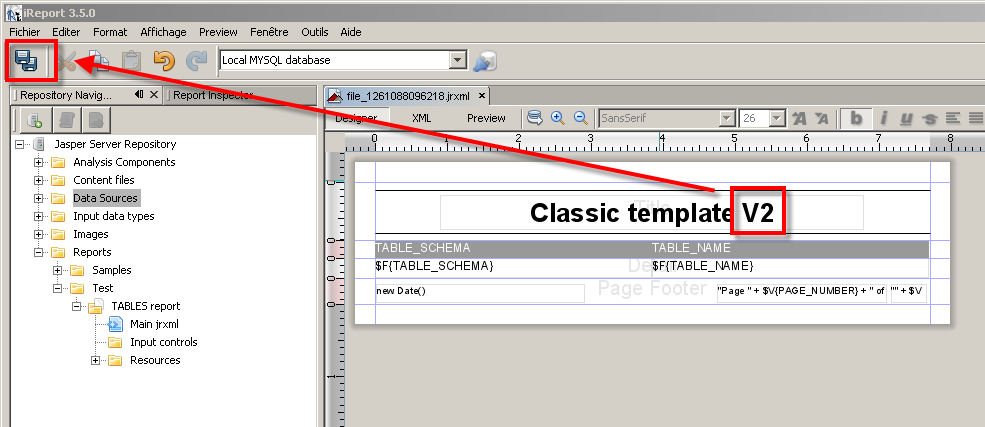
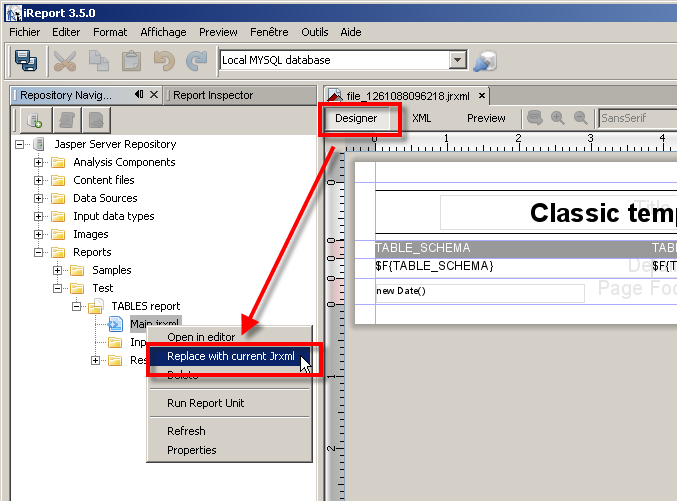
This is only saved locally. To deploy these changes to the server, you need to select the jrxml in the navigator and select ‘Replace with current jrxml’. To select this option, you’ll need to be in the Designer tab:

jasper reports replace with current jrxml

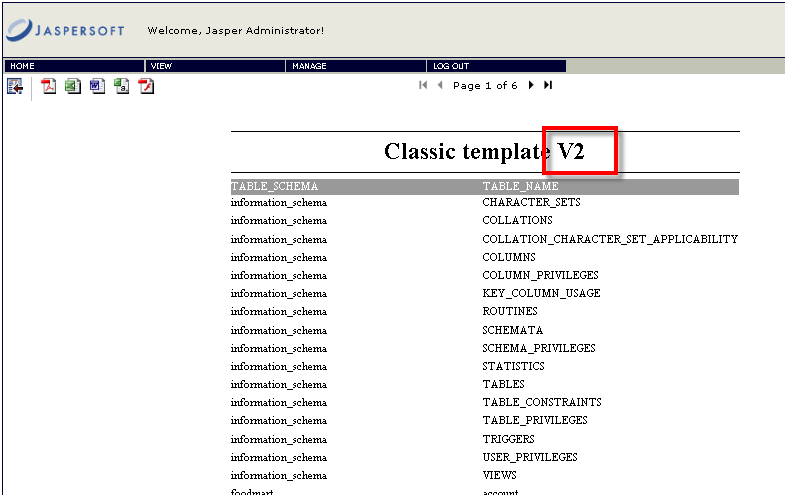
This takes the local file and sends it to the server. The report has been updated on the server:

jasper reports updated report

Next, we'll look at adding parameters to the reports. Next>>

06 December 2009

Jasper Reports - How to deploy a report to Jasper Server

In the previous article, we created our first report with iReport.

Here, we're going to deploy it to the server.

First, we need to connect iReport to the repository. Select JasperServer Repository in the Window menu to show the repository navigator:

Select JasperServer Repository

Then click on 'Add new server' to create a new server:

create new server

Enter a name, and the username and password (for the samples jasperadmin/jasperadmin), and save. If we then click on the server in the repository navigator, we get the following:

reports and data sources in the repository

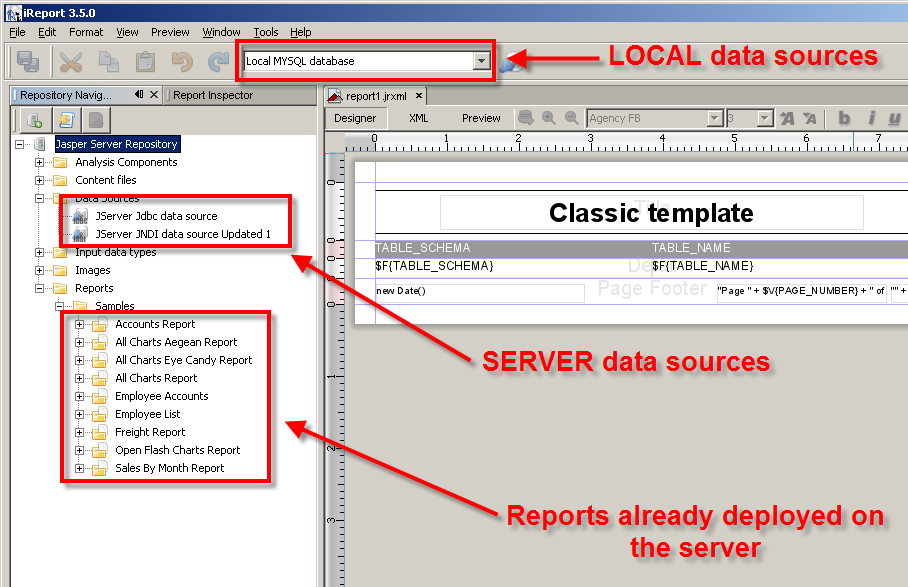
With Jasper, you need to define the data sources for a report. For the preview, the local data source is used, but to display the report from the server, you'll need to define one on the server as well.

In the repository explorer, select the Data sources folder, and right click, select Add->Data Source:

Add new server datasource

Enter a name and a label, and then click on the Data Source Details tab. If you select JDBC data source, you then have the option to 'Import from iReport', where you can select a local data source.


The list of reports in the repository navigator corresponds to the list displayed on the web (see Jasper Reports - Getting Started.)

You can deploy the TABLES report defined in Jasper Reports - Exploring iReport. Now you need to create a Report Unit. A Report Unit is a report plus the data source and any parameters necessary.

We'll create a folder Reports/Test. Then right-click and select Add->Report Unit.

Add Report Unit

The wizard is displayed. Select a name, label and description:

Report Unit enter name, etc.

And the .jrxml file. This is the report1.jrxml containing the report you defined earlier.

Report Unit select datasource

And finally a datasource:

Report Unit select jrxml file

And then the report is available from the web site:

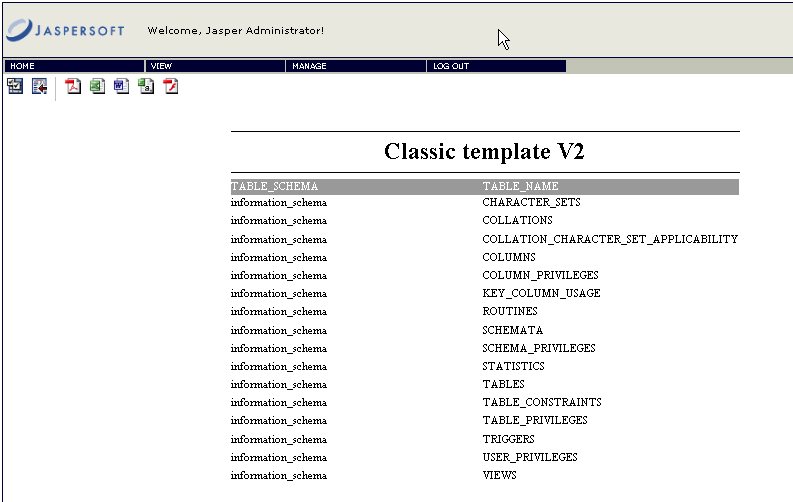
website list of reports including TABLES report

And finally, we can display the report:

TABLES report from the server

Next, we'll look at how to update and redeploy a report to the server. Next>>

05 December 2009

Jasper Reports - Exploring iReport

In the previous article, we explored some of the functionality available with Jasper Reports.

Now, we're going to look at iReport, and how to create a report using iReport. iReport is the easiest method to create and deploy a report to Jasper Reports.

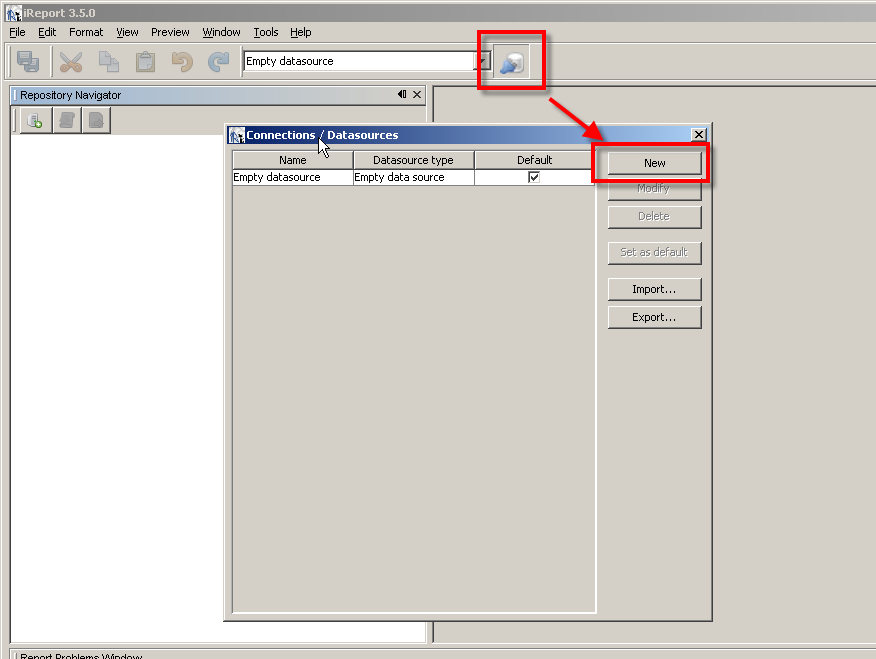
First, we need to create a data source. For our example, we'll use the sample database installed, but you can use any database. First, click on the Report Datasources button to display the local report datasources. Then click on New to create a new datasource:
creation of a new report datasource.
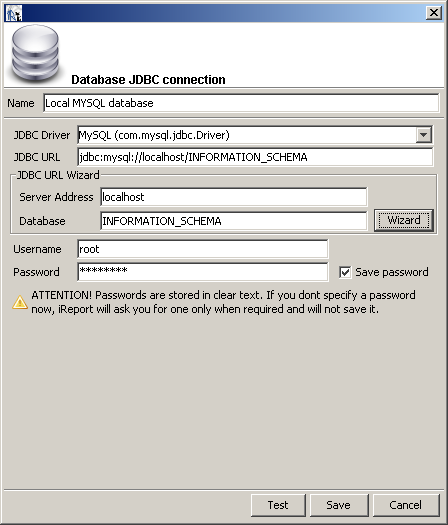
We'll use a Database JDBC Data connection, for the database created when we installed MYSQL. Usually, you would use separate instances for the Jasper admin Database and the data itself, but here we'll keep things simple. We'll use as the datasource the INFORMATION_SCHEMA of the database itself.
Creating a datasource

The default password for root is 'password'.

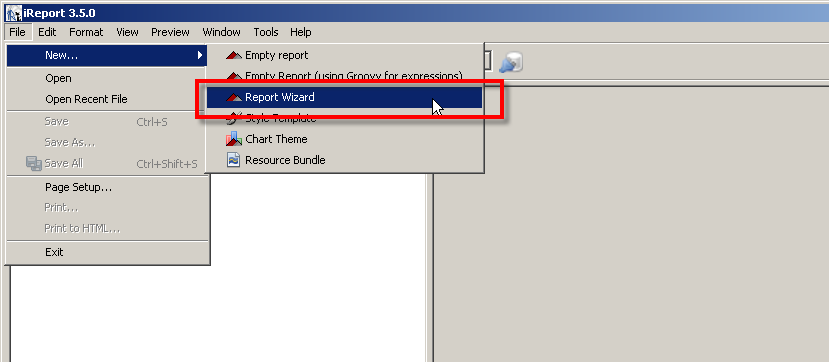
OK. To create a report from scratch, select File->New->Report Wizard:

iReport selection of Report Wizard

In the wizard, you need to select where the JRXML file will be created, the data source the SQL select statement, the columns from the request to display, and the overall format required. iReport displays the created report. This contains all that is necessary to generate the report.

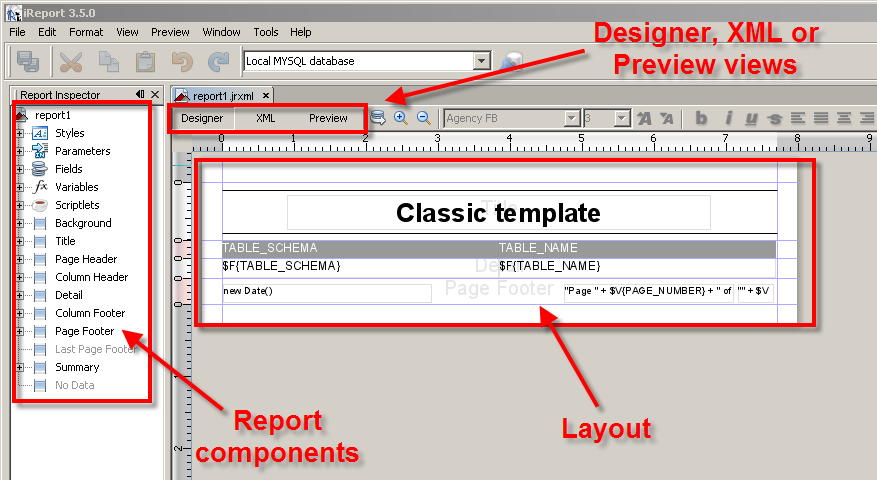
We'll use 'select TABLE_SCHEMA, TABLE_NAME from INFORMATION_SCHEMA.TABLES', select all of the columns and a 'Classic' tabular format report. This gives us:

First report

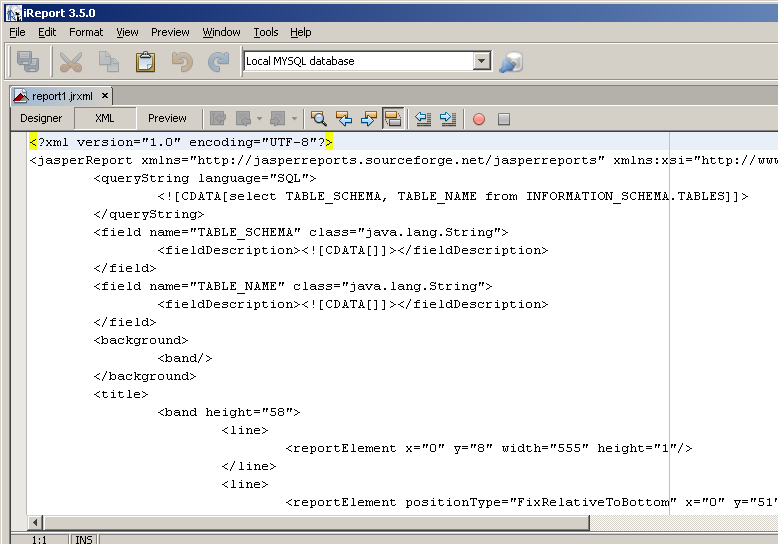
And the XML view (where we can see the source):

First report XML view

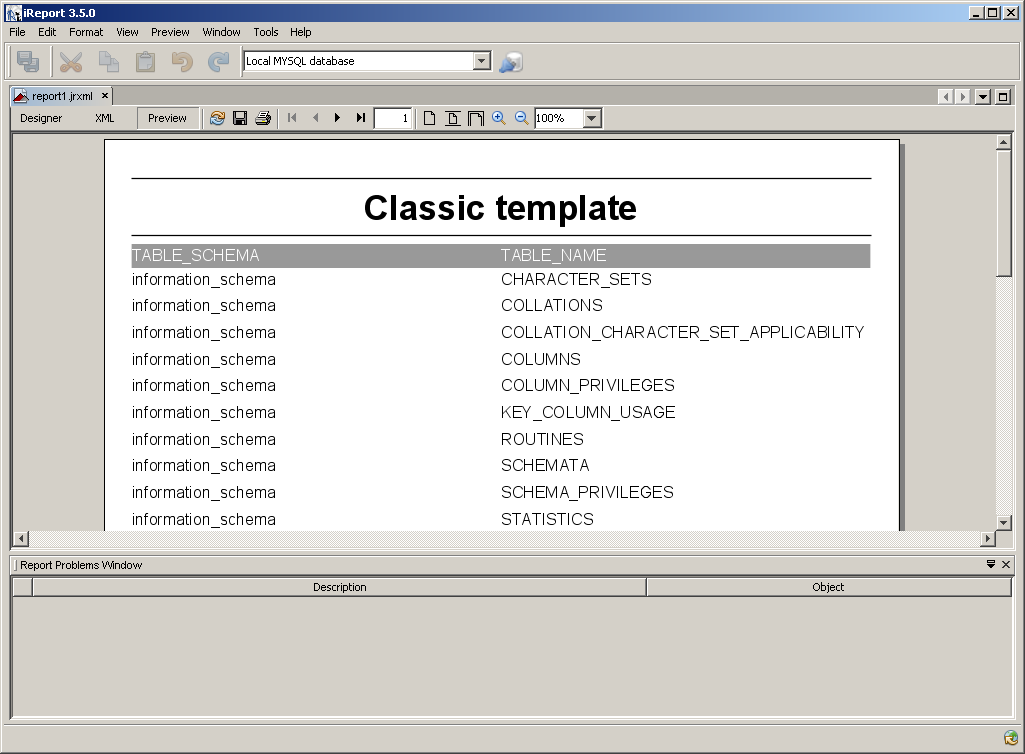
And the preview (where we can see the potential results). Note that this uses the data source selected at the top of the main window.

First report preview view

Next, we'll deploy a report to Jasper Server, and run it from there. Next>>

26 November 2009

Jasper Reports - Exploring Sample Reports

In the previous article, we set up Jasper Server Reports and were looking at the sample reports that come with the installation.

Here, we'll explore some of the base functionality of Jasper Reports.

Using as an example the Jasper Server Report, we can see that Jasper can do a number of things:

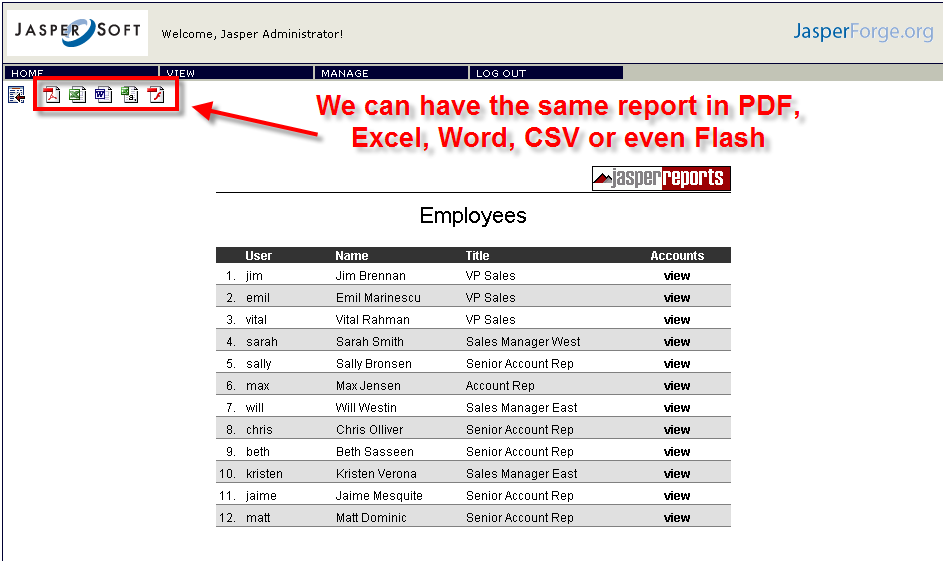
1) Multiple formats for the same report. We only have to write the report once, and the users can display them in a number of formats: PDF, Word, Excel, CSV, Flash and of course HTML:

Employeee list report, different formats available


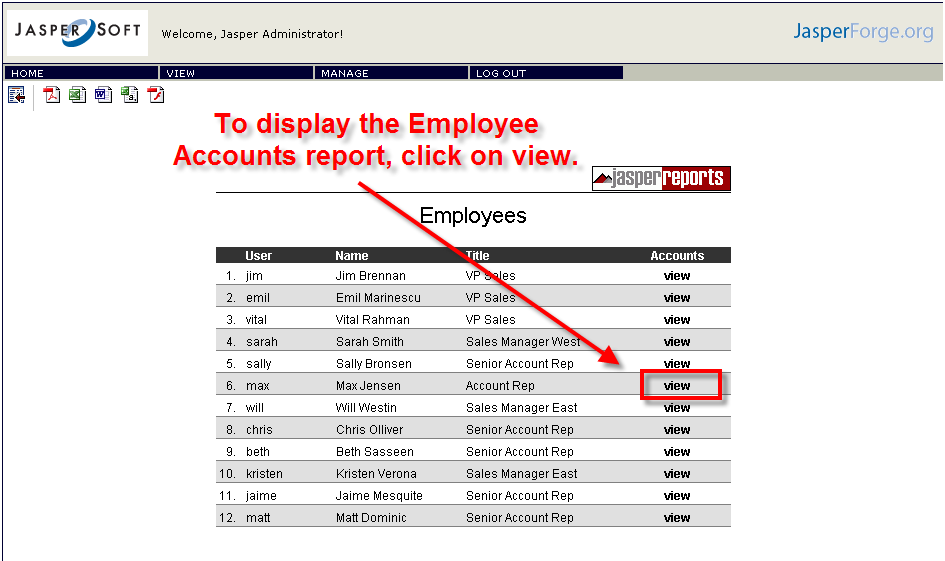
2) Parametered sub-reports are available from a report. The Employee List report contains a link to the Employee Accounts report. The Employee Accounts report requires an employee as a parameter. To display the Employee Accounts report for Max Jensen, you can click on the view link.

Jasper Reports Employee Link to Accounts

The parameter is passed as part of the URL for this report:

http://localhost:8080/jasperserver/flow.html?reportUnit=%2Freports%2Fsamples%2FEmployeeAccounts&EmployeeID=max_id

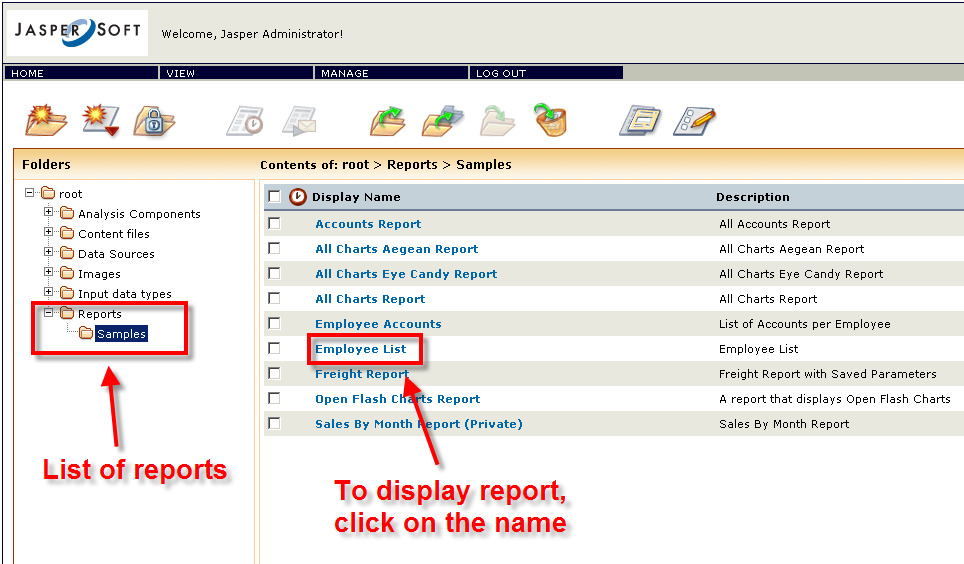
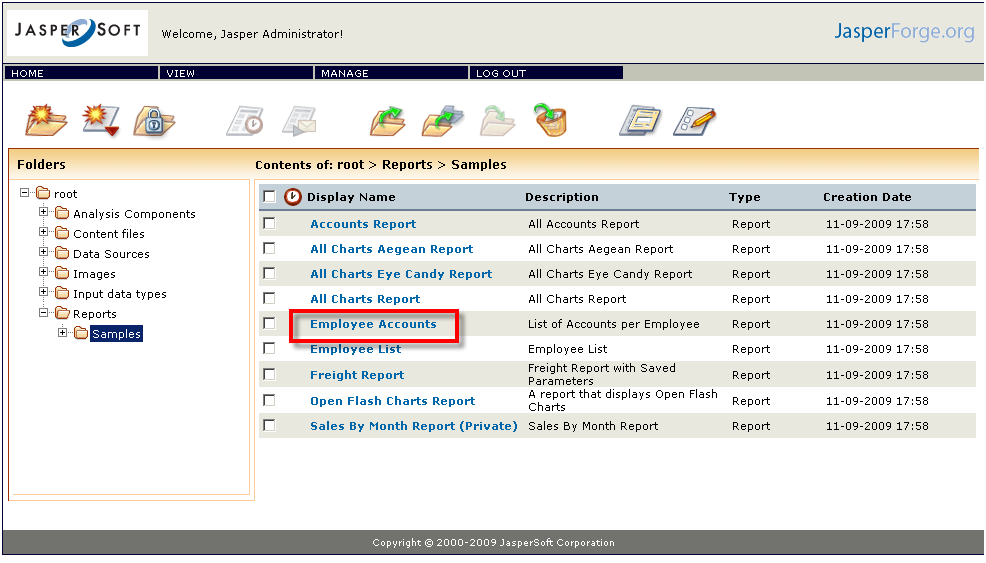
which you can define in the Employee report itself. You can also see that this report is available from the top level list of reports:

Jasper Reports Report List

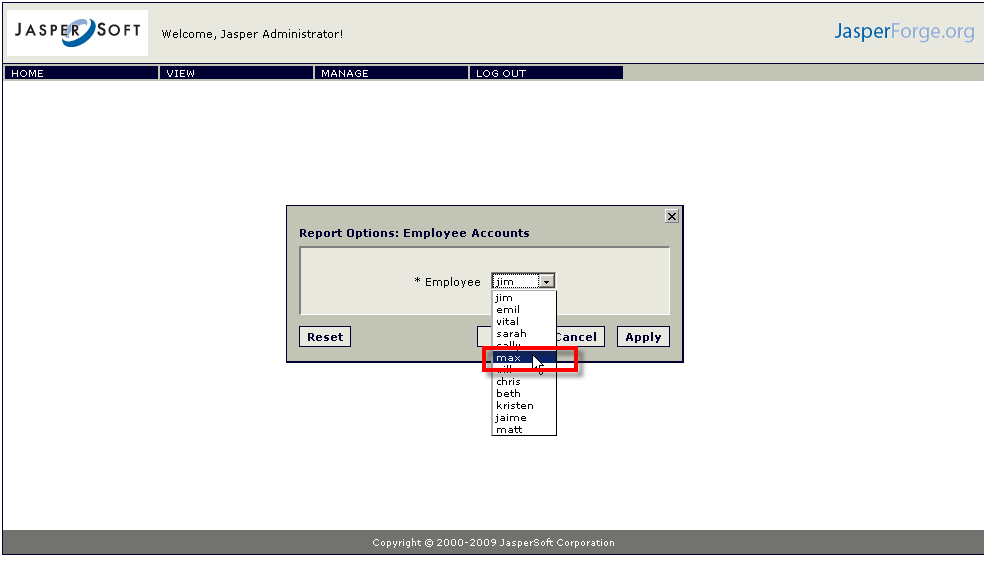
When you click here, you get a list of employees to choose from:

Employee selection

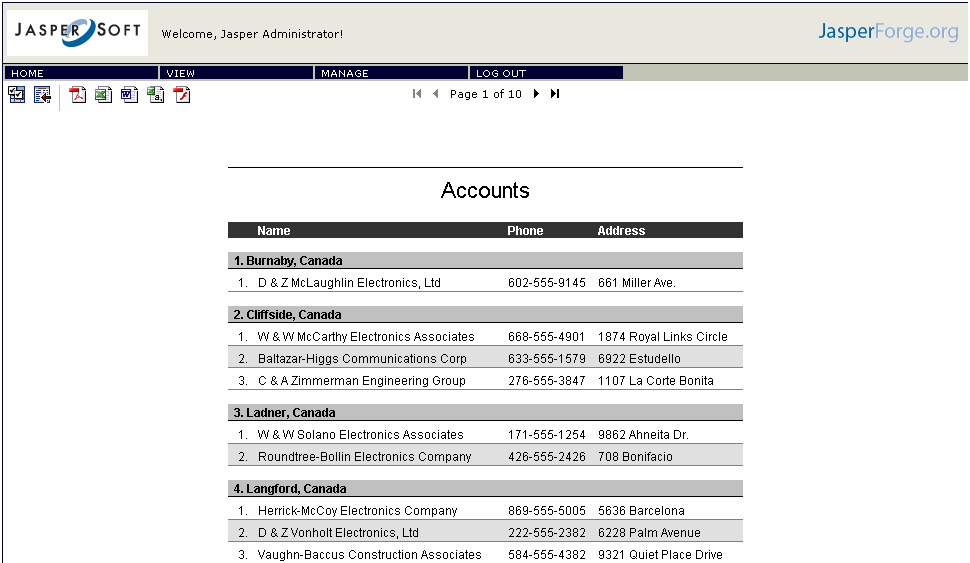
which brings us to the same report that we got when we clicked on the view button in the Employee List:

Employee Accounts report

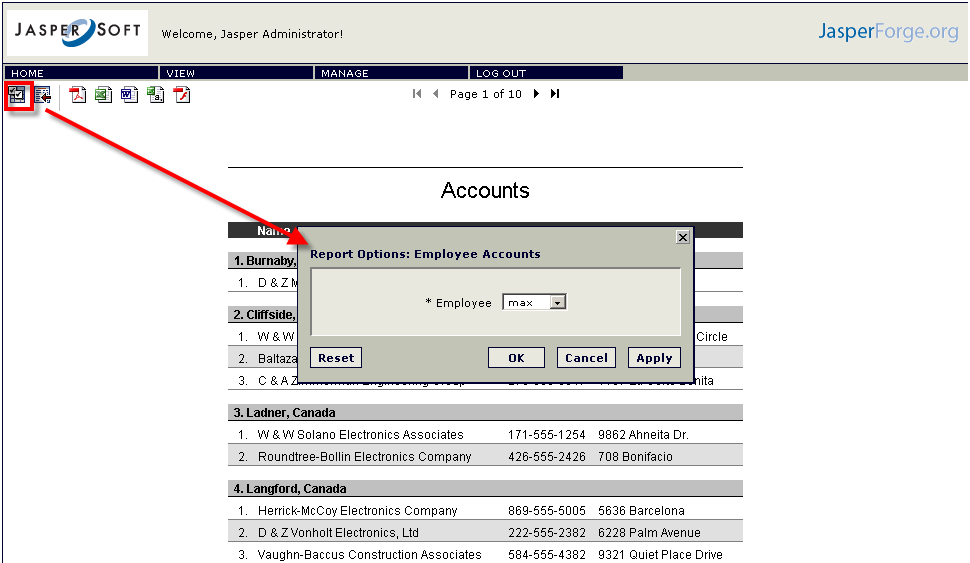
For those reports which require parameters, there is an icon in the top left of the screen to change the parameters:

Select other parameters for the report

Next, we're going to cover iReport, and create and modify some reports. Next>>

24 November 2009

Jasper Reports - Getting Started

I've been exploring the functionality of Jasper Server Reports.

For this, I'm using Jasper Server reports & iReport version 3.5.0. This is available from SourceForge. There is a version for Windows (jasperserver-3.5.0-windows-installer.exe)
and Linux/Solaris/Mac (jasperserver-3.5.0-linux-installer.bin).

We're going to use the windows version.

Once you've downloaded the package, you need to execute it. If you're just evaluating the software, choose the defaults to use the Tomcat, MYSQL and iReport packaged with the executable. If you're evaluating, install the sample reports.

Once you've done that, with Jasper Server started, the web interface is available with http://localhost:8080/jasperserver/login.html.

There are two or three logins already there, jasperadmin/jasperadmin (the administrator) and joeuser/joeuser (an ordinary user).

Login as jasperadmin, and then, nn the tree, click on Reports to display the list of reports:

Jasper Server Reports List of reports

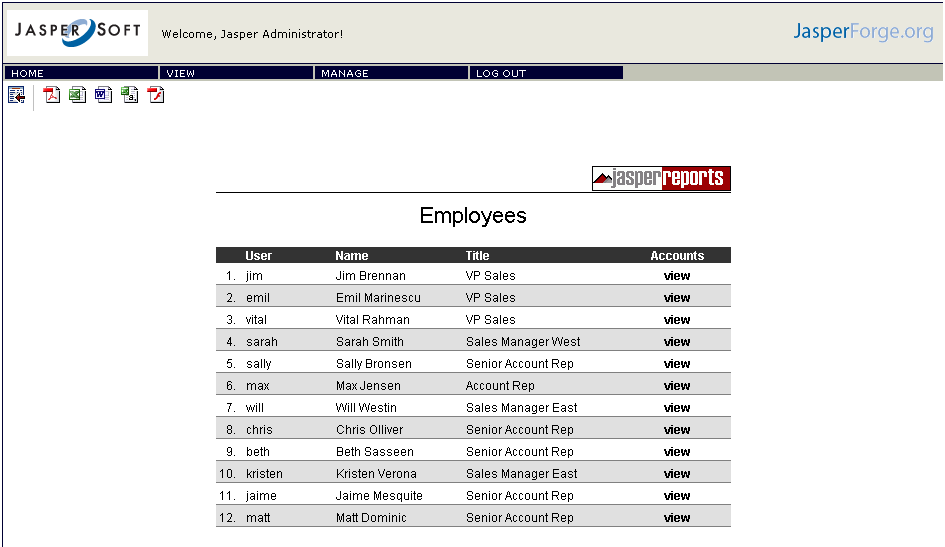
And clicking on one of the reports (Employee List) displays the report in the web page:


Jasper Server Reports Employee List Report

If this is displayed correctly, then Jasper Reports is installed correctly.

We're ready to start exploring the reports themselves Next>>