10 December 2012

JUnit 4.11 - What's new? Hamcrest 1.3

JUnit 4.11 is a major release of the popular testing framework. JUnit now supports version 1.3 of Hamcrest. Hamcrest is a wonderful library to allow matcher objects for match rules to be defined declaratively. JUnit pre 4.11 uses these matchers, and indeed includes version 1.1 of the hamcrest libraries. Which is a problem because hamcrest is now version 1.3, and some of the method signatures have changed.

Let’s have an example. Using the following test as an example:

import static org.hamcrest.collection.IsCollectionWithSize.hasSize;

public class HamcrestTest {
  @Test
  public void test() {
    List<String> list = Arrays.asList("one", "two");

 // test that the collection has a size of 1
    Assert.assertThat(list, hasSize(1));
  }
}

If we compile this and run with JUnit 4.10 and hamcrest-all-1.3.jar.

$ java -cp "hamcrest-all-1.3.jar:junit-4.10.jar:." org.junit.runner.JUnitCore hamcrest.HamcrestTest

and we get

There was 1 failure:
1) test(hamcrest.HamcrestTest)
java.lang.AssertionError: 
Expected: a collection with size <1>
 got: <[one, two]>

This seems to work, but there are two things to note here. The first is that the message is wrong. It’s actually using a different matcher. It should be:

Expected: a collection with size <1>
 but: collection size was <2>

The real problem becomes obvious when we swap the order of the classpath, and put junit before hamcrest.

$ java -cp "junit-4.10.jar:hamcrest-all-1.3.jar:." org.junit.runner.JUnitCore hamcrest.HamcrestTest

There was 1 failure:
1) test(hamcrest.HamcrestTest)
 java.lang.NoSuchMethodError: org.hamcrest.Matcher.describeMismatch(Ljava/lang/Object;Lorg/hamcrest/Description;)V

The problem is that JUnit 4.10 includes some of the org.hamcrest 1.1 class files, so if you mix and match a class from the junit jar (version 1.1) and the hamcrest jar (1.3), then, unsurprisingly, it doesn’t work. This is not good.

So, to the fix. JUnit 4.11 no longer includes the org.hamcrest classes. All of the methods in org.junit.matcher.JUnitMatchers have been deprecated: just replace them with the equivalent from org.hamcrest.CoreMatchers. Use the hamcrest matchers directly. junit-dep is now also deprecated, because hamcrest is now a direct dependency.

So, if we run the above with junit 4.11, we get the correct error message:

$ java -cp "junit-4.11.jar:hamcrest-all-1.3.jar:." org.junit.runner.JUnitCore hamcrest.HamcrestTest

1) test(hamcrest.HamcrestTest)
java.lang.AssertionError: 
Expected: a collection with size <1>
 but: collection size was <2>

05 December 2012

JUnit 4.11 - What's new? Test execution order

JUnit 4.11 is a major release of the popular testing framework. One of the problems addressed was a problem introduced by Java 7, more specifically the JVM. In Java 7, you can no longer guarantee that the order of methods returned by reflection is the same as the order in which they are declared in the source file. Actually, this was never guaranteed, but most JVMs did return the methods in source file order. And all of them did return them in a consistent order. With Java 7, even this is no longer guaranteed. The order that the methods are returned can vary from run to run. To quote the javadoc for Class#getMethods(). my emphasis:

Returns an array containing Method objects reflecting all the public member methods of the class or interface represented by this Class object, including those declared by the class or interface and those inherited from superclasses and superinterfaces. Array classes return all the (public) member methods inherited from the Object class. The elements in the array returned are not sorted and are not in any particular order.

So why did JUnit care about this? JUnit finds the tests that it runs using reflection. And the tests are run in this order. So, if a test suite has implicit or explicit dependencies between tests, a test run can sometimes succeed and other times fail.

So, using the following test case as an example:

public class ExecutionOrderTest {
  @Test public void firstTest() { System.out.println("firstTest"); }
  @Test public void secondTest()  { System.out.println("secondTest"); }
  @Test public void thirdTest()  { System.out.println("thirdTest"); }

  public static void main(String[] args) {
    JUnitCore.runClasses(ExecutionOrderTest.class);
  }
}

Using java 1.6 & 4.10, we get:

firstTest
secondTest
thirdTest

Whereas with java 1.7 we get:

thirdTest
firstTest
secondTest

So the order is different. So, what’s the fix? After a lot of discussion (see Sort test methods for predictability), it was decided to make the sort order of methods deterministic, but unpredictable. So, we still get the tests in a strange order, but at least the next time we run the tests, we’ll still get the same order, which makes debugging a lot easier.

However, even with this, there is still a problem. The algorithm used to calculate the deterministic order is based on the hashCode of the method name, it’s pretty obscure. This means that if I have a problem with ordering then I can’t easily fix it. For instance, the hashCode of “secondTest” is 423863078 and “thirdTest” is -585354599. Which means that thirdTest will be executed before secondTest. But if I want for whatever reason to execute thirdTest after secondTest, I have to rename thirdTest to something with a hashCode of greater than 423863078. Yuck. But, there is a solution.

@FixMethodOrder(MethodSorters.NAME_ASCENDING)
public class ExecutionOrderTest {
  @Test public void firstTest() { System.out.println("firstTest"); }
  @Test public void secondTest()  { System.out.println("secondTest"); }
  @Test public void thirdTest()  { System.out.println("thirdTest"); }

  public static void main(String[] args) {
    JUnitCore.runClasses(ExecutionOrderTest.class);
  }
}

@FixMethodOrder allows the developer to specify that in this case, please execute the tests in order of name ascending. See SortMethodsWith allows the user to choose the order of execution of the methods within a test class. So this will at least allow me to fix the order of my broken (see below) tests. There are three possible values we can specify:

  • MethodSorters.JVM: the order in which the methods are returned by the JVM, potentially different order each time
  • MethodSorters.DEFAULT: deterministic ordering based upon the hashCode
  • MethodSorters.NAME_ASCENDING: order based upon the lexicographic ordering of the names of the tests.

By broken, I mean you shouldn’t have dependencies between tests under normal circumstances. The FixMethodOrder will at least allow you to ‘fix’ your tests until you can work out where the dependency is and eliminate it.

28 November 2012

JUnit 4.11 - What's new? Parameterized descriptions

JUnit 4.11 is a major release of the popular testing framework. Amongst the changes were changes to how Parameterized tests are described by the various runners (maven surefire, Eclipse etc).

With JUnit 4.10, when you ran a Parameterized test, all you got in the description was an integer index, which wasn’t very useful. Taking the following test class as an example:

@RunWith(Parameterized.class)
public class ParameterizedTest {
  @Parameters
  public static Iterable<Object[]> data() {
    return Arrays.asList(new Object[][] {
      { 0, 0 },
      { 1, 1 },
      { 2, 1 },
    });
  }

  private int input;
  private int expected;

  public ParameterizedTest(int input, int expected) {
    this.input = input;
    this.expected = expected;
  }

  @Test public void test() {
    assertEquals(expected, Fibonacci.compute(input));
  }

  public static void main(String[] args) {
    RunListener runListener = new RunListener() {
      public void testFailure(Failure failure) throws Exception {
        System.out.println("testFailure " + failure.getDescription().getDisplayName());
      }
    };
    JUnitCore jUnitCore = new JUnitCore();
    jUnitCore.addListener(runListener);
    jUnitCore.run(ParameterizedTest.class);
  }
}

When we run this (as a main method), we get the following output:

testFailure test[0](uk.co.farwell.ParameterizedTest)
testFailure test[1](uk.co.farwell.ParameterizedTest)
testFailure test[2](uk.co.farwell.ParameterizedTest)

The output isn’t very useful when we’re debugging tests, especially if there are lots of them. So, JUnit 4.11 allows the description of the test to be modified by adding a annotation parameter:

@Parameters(name = "{index}: fib({0}) should be {1}")
public static Iterable<Object[]> data() {
  return Arrays.asList(new Object[][] {
    { 0, 0 },
    { 1, 1 },
    { 2, 1 },
  });
}

The {0} is replaced by the first parameter for the test, and so on. Now the description is much more, well, descriptive:

testFailure test[0: fib(0) should be 0](uk.co.farwell.ParameterizedTest)
testFailure test[1: fib(1) should be 1](uk.co.farwell.ParameterizedTest)
testFailure test[2: fib(2) should be 1](uk.co.farwell.ParameterizedTest)

However, when running with the junit runner in Eclipse, you need to be careful. When it creates the descriptions for the test classes, it uses (approximately) ‘uk.co.farwell.ParameterizedTest(test)’. It then uses the name of the test to work out which class and method to jump to when you double click on the test in the junit view. So if, as above, we use parentheses in the description, this doesn’t work. It also screws up the display of the test name in the junit view.

Eclipse with incorrect test names

The moral of the story: Don’t use parentheses in your descriptions for parameterized tests.

21 November 2012

JUnit 4.11 - What's new? Rules

JUnit 4.11 is a major release of the popular testing framework. Amongst the things I contributed were changes to @Rule and @ClassRule, to allow these annotations to be used on a method as well as a public field. I wanted this because I use Rules heavily in Java, and I wanted to be able to use them in Scala as well. Mainly to make the transition from Java to Scala easier.

Let’s take an example:

public class JavaRuleTest {
  @Rule public ExpectedException expectedException = ExpectedException.none();
 
  @Test
  public void test() {
    expectedException.expect(NumberFormatException.class);
    Integer.valueOf("foo");
  }
}

So this test uses the ExpectedException rule which allows you to say that you expect to receive an exception, in this case a NumberFormatException. Which we do. So the test passes. If we translate this directly to Scala, we get:

class ScalaRuleTest {
  @Rule val expectedException = ExpectedException.none()
 
  @Test def test() {
    expectedException.expect(classOf[NumberFormatException])
    Integer.valueOf("foo")
  }
}

But this produces an error:

The @Rule 'expectedException' must be public.

Although we’re defining a ‘public’ field expectedException, Scala implements this as a private field with an accessor method. So JUnit expects a public field, but finds a private one; the test fails. But now, with JUnit 4.11, we can apply a @Rule to a method:

class ScalaRuleTest {
  val expectedException = ExpectedException.none()
 
  @Rule def expectedExceptionDef = expectedException
 
  @Test def test() {
    expectedException.expect(classOf[NumberFormatException])
    Integer.valueOf("foo")
  }
}

We still need the val expectedException, so that we can refer to it in test(), but we add expectedExceptionDef and move the @Rule annotation to there. And now the test passes.

Similarly, for @ClassRule, you can do the same, but Scala doesn’t have static variables/methods, so you’ll need to add it to the companion object:

object ScalaClassRuleTest {
  @ClassRule def externalResource = new ExternalResource() {
 protected override def before() = println("before")
 protected override def after() = println("after")
  }
}

class ScalaClassRuleTest {
  @Test def test() {
 System.out.println("a test")
  }
}

This change allows me to take my Java code and translate it (almost) directly into Scala, as a stepping stone to rewriting everything completely to use Scalatest or Specs2. Also, other Java programmers may find it useful :-)

12 January 2012

Generating bytecode with errors in Scala


Following this blog post from James Iry: Type errors as warnings, and as it's something I've been thinking about recently applying to the Scala-IDE (Eclipse plugin for Scala),
I thought I'd stick my oar in as well.

The Eclipse JDT compiler creates the .class file even when there are errors in the source code. For instance:
public class Foo {
public void error() {
int foo = "bar";
}

public void ok() {
int foo = 4;
}
}
If you take the above java as an example, the javac compiler would not generate the .class file, but the Eclipse JDT compiler does.
It produces the equivalent of the following (using JAD):
public class Foo {
public Foo() {}

public void error() {
throw new Error("Unresolved compilation problem: \n" +
"\tType mismatch: cannot convert from String to int\n");
}

public void ok() {
int foo = 4;
}
}
Note that this still shows up as a compilation error in Eclipse, in the Problems view. Note also that calling the error() method will never work.

So should we apply the same trick to Scala? Yes.

But why is this useful? When you're refactoring, or just plain developing, you don't have to fix all of your errors at once.
If you're doing a spike, you can do a single change, make sure it works by running the unit tests (for that class), and then move on to the next implementation.
You can experiment. You can see if a solution works.

Note that I am not suggesting relaxing any type constraints, or any constraints of any kind.
Note also that I've never seen problems come from this feature of Eclipse either; actually, I've never worked on a project where the Eclipse
compiler was used for producing production code. It's always been javac.
I'm also not suggesting that this be available with the normal scalac compiler.
I think it should only be available from the Eclipse IDE, to stop leakage into production code.

20 November 2011

Central exception handling in Scala

Have you ever seen this in Java code?
public class AssignResponseImpl extends ServletSupport {
public AssignResponse assign(Ident ident, int low) {
try {
return getService().assign(ident, low);
} catch (Exception e) {
logger.debug("caught Exception", e);
return new AssignResponse("ERROR", e.getMessage());
}
}
}
This sort of java code always irritates me. I've got about 20 of these classes. They are there to glue the Axis servlets to my services.
The reason I don't like them is you can't factor them. And because you can't factor them, it's difficult to create (and maintain) standard behaviour.
Like always logging the error. And always returning the exception message in the correct place. Let's have a look at another:
public SearchResponse search(Ident ident, Criteria criteria) {
try {
return getService().search(ident, criteria);
} catch (Exception e) {
logger.debug(e);
return new SearchResponse("ERROR", e.getMessage());
}
}
Notice the subtle change in behaviour? No? It's in the logger. These methods are in two different unrelated services. But they are very similar, and require the
same error handling.
Now, SearchResponse and AssignResponse share a common superclass, Response. So in the case of an exception, only the class differs, the fields
we're filling in are those in Response. This doesn't really help in Java, we have to cut and paste the try catch, with only the name of the class changing.
We also have to add
in the extra constructor into the subclasses, and all they do is fill in the fields in the superclass. But in Scala, we can use
two tricks: manifests and first class functions.


Manifests allow you access to information about classes which you wouldn't normally have available in Java, in this case the
return type of the service method (A):
abstract class ServletSupport[A <: Response] {
protected def exception(fn: => A)(implicit m: Manifest[A]): A = {
try {
fn
} catch {
case e => {
logger.debug("caught Exception", e)
// create new instance of A
val t = m.erasure.newInstance().asInstanceOf[A]
t.setResponseCode("ERROR")
t.setMessage(e.getLocalizedMessage())
t
}
}
}
}
In our service endpoint superclass, we've defined exception, which takes as parameters a function (taking no parameters and returning
A, the return type of our target method), and an implicit Manifest parameter. Importantly, this is added by the Scala compiler, so we don't have to add
the parameter manually.
In this case, we're asking for extra information about A.


Our exception method calls the passed in function, and if there isn't an exception thrown, then it returns the value returned by the function. If there is
an exception, then the return value is a new instance of A, with the response code and message filled in. We know that we can call setResponseCode and setMessage on an A
because in the class definition, we're setting the type bounds of A, it has to extend Response. OK, so what is our calling code like now?
class AssignResponseImpl extends ServletSupport[AssignResponse] {
def assign(ident: Ident, low: Int) = exception {
getService().assign(ident, low)
}
}
Now, we have standard error handling between web services; all I have to do is add a exception {} round the delegated call. In this case, we can use {} rather than ():
this means it looks like it's part of the language. And this is all type safe, I only have to specify the name of the response class once in the definition.

07 November 2011

How to inherit static methods in Scala

In our project we're using Apache Axis soap web services. With Axis, you have to define your pojos in a certain way. Not only do you need your getters and setters, you have to define a static method so that the axis libraries can find out type information to create the wsdl and static methods to serialize and deserialize to and from XML. These must be static methods, so are very hard to factor out in Java. We need to duplicate them for each POJO class.
public class WebServiceObject {
    private Integer id;

public Integer getId() { return id; }
public void setId(Integer id) { this.id = id; }
// Type metadata public static TypeDesc getTypeDesc() { TypeDesc typeDesc = new TypeDesc(WebServiceObject.class, true); typeDesc.setXmlType(new QName("to", "WebServiceObject")); SoapHelper.addTypeDesc(typeDesc, "id", "int", true); return typeDesc; }
public static Serializer getSerializer(String mechType, Class<?> javaType, QName xmlType) { return new BeanSerializer(javaType, xmlType, typeDesc); }
public static Deserializer getDeserializer(String mechType, Class<?> javaType, QName xmlType) { return new BeanDeserializer(javaType, xmlType, typeDesc); } }
As you can see, there is a lot of boilerplate here. Some of the POJOs are large (66 attributes), so there is a *lot* of boilerplate. Is there anything we can do about this? Let's see. The first thing we can use is @BeanProperty, to get rid of the getters and setters. This annotation, which we can apply to a field, generates a getter and setter for that field.
class WebServiceObject {
  @BeanProperty var id: Integer = _
}
So already this is a lot better. But what about the static methods? We can apply a trick here. If we define a method in a companion object, then the class gets a static forwarder for that method. So I can define a getTypeDesc in the companion object, and then java can call it using the normal static way, i.e: WebServiceObject.getTypeDesc(). And we can use inheritance with companion objects. Yay!
So this is the entire code:
class WebServiceObject {
  @BeanProperty var id: Integer = _
}

object WebServiceObject extends SoapSerializer { val typeDesc = { val typeDesc = createTypeDesc(classOf[WebServiceObject], "to", "WebServiceObject") addTypeDesc(typeDesc, "id", "int", true) } }
trait SoapSerializer { val typeDesc: TypeDesc
def getTypeDesc() = typeDesc
def getSerializer(mechType: String, javaType: Class[_], xmlType: QName) = new BeanSerializer(javaType, xmlType, typeDesc)
def getDeserializer(mechType: String, javaType: Class[_], xmlType: QName) = new BeanDeserializer(javaType, xmlType, typeDesc) }
So our pojo has gone from 26 java lines to 9 Scala lines. Our 66 attribute POJO was 698 lines but is now 154.
There is more we could do, but this is enough for the minute. Our code is pretty well factored, and the amount of duplication is now acceptable. More importantly, you can read the code :-)

25 October 2011

Reducing boilerplate in Scala

I've often heard claims from Scala advocates that coding in Scala rather than Java saves time, reduces the number of lines of code and clarifies the code, removes the boilerplate.
They say it makes the code easier to read.


So, as a long term project, I'm going to be translating one of our reasonably sized (~50k lines) projects from Java to Scala. I'll post something when I find something interesting.

I'm doing this to answer the following questions:
  • Can I use mix and match Scala and Java? This is one of the selling points of Scala. You can use Java technology and libraries easily from Scala. My project uses (old versions of) hibernate, Spring, Spring MVC. We'll see.

  • When I've finished, will I have fewer lines of code? Again, one of the selling points of Scala.

  • When I've finished, will my code be understandable? One of the points of contention of Scala is its perceived complexity. The old adage says: 'You can write Fortran in any language', but will we end up with a codebase which is unavoidably incomprehensible? Inherent complexity is one thing, accidental complexity is another, but will we have designed-in complexity?

  • Is the tooling up to the job? I mean in particular eclipse, maven, some of the other eclipse plugins. The Scala-IDE has improved a lot recently, but is it robust enough?

One thing I want to avoid is refactoring that could be done in Java. I want to compare well written Java code with well written Scala.
I'm going to translate class by class where possible, and then improve the code, make it more idiomatic.

I am reliably informed that the best place to start is my testing code, my junit tests. Testing code isn't delivered to the customer, you can try something and not have it affect production code.

First things first. The old project was developed using Eclipse Galileo. This is no longer an option if I'm going to use Scala, the plugin doesn't work with it.
I'll need to upgrade to Helios.
This is essentially pain free (except for some maven issues, which I'll deal with later).

The project contains some soap services (developed using Apache Axis2). We test using a stub class and we have one test per service.
When we translate the tests directly from Java to Scala, we don't usually gain very much. For example, we have a java method such as:
private Calendar getDate(String dateString) throws Exception {
Calendar calendar = Calendar.getInstance();
calendar.setTime(new
SimpleDateFormat("dd.MM.yyyy").parse(dateString));
return calendar;
}
we end up with the following Scala method:
private def getDate(dateString: String) = {
val calendar = Calendar.getInstance();
calendar.setTime(new
SimpleDateFormat("dd.MM.yyyy").parse(dateString));
calendar
}
So the only thing we've gained is the lack of a return type (which is inferred to be Calendar) and the lack of throws Exception. Scala does not have checked exceptions, we don't need it.
Some methods, however, condense down a lot.
private Set getErrorCode(ErrorTo[] errors) {
Set set = new TreeSet();

for (ErrorTo error: errors) {
set.add(error.getCode());
}

return set;
}
In Scala, this becomes:
private def getErrorCode(errors: Array[ErrorTo]) =
new TreeSet(errors.map(_.getCode).toSet)
There is actually quite a lot to see here. Scala is much more expressive when dealing with collections. The map() method applies a
function to every entry in a collection, in this case an Array, and returns another collection (a Seq). We're applying getCode to
each entry in the array and returning a new collection (of String). _ refers the 'current instance'. So we're converting from an Array[ErrorTo] to a Seq[String].
Seq is another Scala collection type. We convert this to a Set (a Scala Set) and populate a java.util.TreeSet, because we wish to maintain interoperability with Java. For the minute.

We're using implicit conversions to convert between Scala & Java collections. In Scala, we can define an implicit conversion between two classes
so that if we want one of them but have the other, the classes get converted magically. So the toSet function returns a scala Set.
But java.util.TreeSet doesn't have a constructor which accepts a Scala Set, so we have to convert it. We have to import scala.collection.JavaConversions._
import scala.collection.JavaConversions._
These implicit conversions can be a performance problem sometimes, because you're potentially converting between objects multiple times, but we don't care about them here,
because this is testing code :-).

Why is Scala so much more concise than Java here? One reason is the type inference. In the java method, we mention Set three times, in Scala only once.
That, the map() function and the lack of a return statement in Scala reduces a 7 line java method down to a single line. It can be on a single line, so it goes on a single line. Because we can.

Next, we'll look at how we can use static methods and how to inherit them.

01 October 2011

Using git svn with a large repository

I've started using the git svn bridge for one of our projects, but I had a couple of problems with the initial clone of the repository, due to the file size
(some > 100Mb), and to the subversion server dropping the connection.
So, I started using the standard git svn clone:
$ git svn clone https://svn.farwell.co.uk/svn/project --stdlayout
Initialized empty Git repository in c:/code/project/.git/
r1 = 339bd134b2d482cf9038c16fa75f93255ebfbc1a (refs/remotes/trunk)
W: +empty_dir: trunk/blah1
W: +empty_dir: trunk/blah2
W: +empty_dir: trunk/blah3
W: +empty_dir: trunk/blah4
....
The --stdlayout means that git expects the trunk to be called trunk, tags be called tags and branches to be called branches.
Note also that you need to specify the url without the trunk at the end. This ran for a while, and then fell over, because svn dropped the connection on me. There is a timeout on the server.
RA layer request failed: REPORT request failed on '/svn/project
/!svn/vcc/default': REPORT of '/svn/project/!svn/vcc/default':
Could not read chunk delimiter: Secure connection truncated (ht
tps://svn.farwell.co.uk) at C:\Program Files (x86)\Git/libexec/
git-core/git-svn line 5114
We need to load in batches. git fetch has a -r option to allow you to specify the range of revisions to fetch. We've got some large files, so we'll do 10 at a time.
I started again:
$ git svn clone https://svn.farwell.co.uk/svn/project \
--stdlayout -r1:2
which fetched the first two revisions, but we have to fetch the rest, about 1000 revisions. I used a quick perl script.
my $count = 1;

while ($count <= 1000) {
# executes git svn fetch -r1:11 etc.
my $cmd="git svn fetch -r$count:" . ($count + 10);
print "$cmd\n";
system($cmd);
$count += 10;
}
But then we get another problem: git is running out of memory; it crashed and this time it's more serious. Another problem with our big files. This is the error message:
Out of memory during "large" request for 268439552 bytes, total sbrk() is 140652544 bytes at /usr/lib/perl5/site_perl/Git.pm line 898,  line 3.
Git svn uses perl to download and process the files, but it slurps the entire file in one go. So for our large files, it runs out of memory.

After a bit of searching on the internet, I found a solution on github for our problem: Git.pm: Use stream-like writing in cat_blob().
This is a fairly simple patch, which doesn't seem to have made it into a release yet, so I applied it manually to C:\Program Files (x86)\Git\lib\perl5\site_perl\Git.pm.
@@ -896,22 +896,26 @@ sub cat_blob {
}
my $size = $1;
-
- my $blob;
my $bytesRead = 0;

while (1) {
+ my $blob;
my $bytesLeft = $size - $bytesRead;
last unless $bytesLeft;

my $bytesToRead = $bytesLeft < 1024 ? $bytesLeft : 1024;
- my $read = read($in, $blob, $bytesToRead, $bytesRead);
+ my $read = read($in, $blob, $bytesToRead);
unless (defined($read)) {
$self->_close_cat_blob();
throw Error::Simple("in pipe went bad");
}

$bytesRead += $read;
+
+ unless (print $fh $blob) {
+ $self->_close_cat_blob();
+ throw Error::Simple("couldn't write to passed in filehandle");
+ }
}

# Skip past the trailing newline.

@@ -926,11 +930,6 @@ sub cat_blob {
throw Error::Simple("didn't find newline after blob");
}

- unless (print $fh $blob) {
- $self->_close_cat_blob();
- throw Error::Simple("couldn't write to passed in filehandle");
- }
-
return $size;
}
I restarted the process from the beginning and voilà, it got to the end. All of the revisions had been fetched, all that was left to do was a
$ git svn rebase
to merge the changes into the tree and have a working git repo.

If had wanted to migrate from svn to github, rather than continue to use git svn, I'd have done exactly the same thing, but add a --no-metadata to the clone command.
And obviously you don't need to to an svn rebase, just a rebase.

12 April 2011

Playing with Restructure 101 - Java

A couple of months ago, I went to the JUGL (Java User Group Lausanne), at which they had a comparison between various packages for analyzing quality, including Sonar, Coverity, Jtest, Xdepend and Restructure 101.

I decided to play with some of them and really try them out. So we're starting with Restructure 101.

Please note that I am in no way affiliated with Headway Software.

Restructure 101/Structure 101 is a package which analyzes your code base in terms of complexity, along two axes, which they call FAT and Tangle. A package/jar/whatever is fat if there are lots of classes in it. Your code is tangled if there are loops in your dependency graph, or if there are too many dependencies between packages. For instance, if package a depends on package b which in turn depends on a, you've got a loop. This is considered bad.

So, as a test I'm using a single jar from one of our projects. (Java 1.4, Hibernate 2). Even before I start this, I know it's badly structured and hard to follow, but what's the best way to improve this?

In Restructure 101, you import the jar into a new project and it shows you:


So we can see in the top left, we've got a fairly tangled codebase, but not too fat. (You can adjust the parameters).

By double clicking on a package, you expand it, and you start to see the links between packages. Do we drill down a bit, looking for tangles


So we look for stuff with a red background. The blue lines indicate the dependencies which cause tangles. After a minute or so, we have the following:


We seem to have found it. So, what does this diagram mean? In fact, we have a package bo, and a sub-package bo.impl, and a corresponding modele and modele.impl. The bo contains the base interfaces and abstract classes and modele the model interfaces and concrete classes. So what can we do about this? Restructure 101 allows us to drag and drop from one package to another. So we'll take the interfaces from bo and put them into modele and the abstract classes from bo.impl to modele.impl.


which looks a lot better, and I think is a lot easier to understand. All of my model is in one place now. It's a pretty big package (56 classes), but acceptable because all the classes are the same type of object. When I'm in this package, I don't need to think. This improved clarity of architecture is reflected in the complexity indicator:


which has moved in the right direction (down). We'll stop there.

This is all very nice, but what can we do with this information? Restructure 101 gives us a number of options. The first and probably most useful is to export the list of actions made in Restructure 101 into the Eclipse plugin. I can't do this because I've only got an evaluation license, so I can't tell you whether or not it works :-). But even without the export, I can go to Eclipse and know what to do.

So, for my test jar, I found Restructure 101 useful, without even going very deep into the functionality. You can do a lot more, including publishing to a repository, for changes to be picked up by the eclipse plugin, and there is a sonar plugin.

Next, I wonder how this will react to a Scala project.

27 February 2011

Replacing properties with a groovy script

I've used groovy in a interesting way recently.

We were writing a Spring/JSF application for a client which managed a set of accounts for the local council. This would send invoices to another system, using a proprietary file format. Part of the file sent contained the text that would be printed out and sent to the client (of the council), including text which could be changed by the council, such as email addresses, phone numbers.

So we had two problems:

1) How do we nicely provide a way for the council to change the names, email addresses and phone numbers on the final invoice? We could have 20 different properties defined, but this is a nightmare.
2) We're talking about formatting invoices, during testing we would have a lot of to-ing a fro-ing with the client, how do we minimize this?

Our solution: use a groovy script which is invoked from java. The script is delivered in the same directory as the other properties (so the client can edit it). We can also modify it and redeploy rapidly when client changes their mind without having to redeploy the entire application.

In the server, we have a java method which invokes the groovy script. To keep this simple, the groovy script we set as input a variable called invoice (an object) and defines a variable called output, a String, which represents the text that will end up on the invoice sent to the user. Here is the java which calls the script:

package uk.co.farwell;

import groovy.lang.Binding;
import groovy.util.GroovyScriptEngine;

import org.codehaus.groovy.control.CompilerConfiguration;

public final class RunGroovyTemplate {
public String runTemplate(String root, String script, String encoding, Invoice invoice) throws Exception {
String[] roots = new String[] { root };
GroovyScriptEngine gse = new GroovyScriptEngine(roots);
Binding binding = new Binding();
binding.setVariable("invoice", invoice);

CompilerConfiguration compilerConfiguration = new CompilerConfiguration();
compilerConfiguration.setSourceEncoding(encoding);
gse.setConfig(compilerConfiguration);
gse.run(script, binding);

return binding.getVariable("output").toString();
}
}

Nothing very complex there. And this method is called with something like:

String output = new RunGroovyTemplate().run("C:\\temp", "template.groovy", "UTF-8", invoice);

System.out.println("output=\n\n" + output);

Again, nothing complex. Ok, so what does the groovy look like?

output = "Invoice number: ${invoice.id}\n\n"

for (line in invoice.lines) {
output = output + " ${line.description} ${line.total}\n"
}

output = output + "-------------------\n";
output = output + "total ${invoice.total}\n";

output = output + """
--
Please inform us of any changes :
billing address or name(s)

Contact details:

For questions about this invoice:
Fred Bloggs: 021 454 67 78
E-mail: fred.bloggs@foo.com
"""

So you can see that we've not got a lot of Java, but we've built in a lot of flexibility by using groovy. I've carefully separated out the contact details so that they can be changed easily on site.

The output from this looks like:

Invoice number: 66

description 34.00
-------------------
total 34.00

--
Please inform us of any changes :
billing address or name(s)

Contact details:

For questions about this invoice:
Fred Bloggs: 021 454 67 78
E-mail: fred.bloggs@foo.com

The disadvantage of this approach are that we are delivering a script to a client, which isn't always a good thing to do, but we thought that the advantages of this approach outweighed the disadvantages.


And don't forget that this can be unit tested just as easily as a pure Java solution.

21 February 2011

Backup, backup backup

I was having problems with my Dell Precision M4500. It wasn't booting:


Windows failed to start. A recent hardware or software change might be the cause. To fix the problem:

1. Insert your windows installation disc and restart your computer.
2. Choose your language settings, and then click "Next".
3. Click "Repair your computer"

If you do not have this disc, contact your administrator or computer manufacturer for assistance.

File: \Status: 0xc000000f

Info: An error occured while attempting to read the boot configuration data.

After panicking that my hard disk was broken, I discovered that this was a problem with the windows boot manager.

So, I made a Windows recovery disk from another Windows 7 machine I had, and tried to boot from that. Didn't work. Same problem. Ah, OK, we'll switch off booting from the hard disk, just boot from the CD. F2 to enter setup on the Dell Precision, sorted.

It took an awful long time to boot from the CD, it's always worrying when that happens. But it boots. The CD says that it's a problem with the boot manager, do you want me to fix it. I say yes. And it does work. It reboots successfully.

First thing to do, install Crashplan and do a backup. Just in case.

Then I switched the boot from disk back on, and reboot. It works. Woohoo.

Moral of the story (two actually):

Make a windows recovery disk, before you need it.
Backup, and test your backups. I've started to use Crashplan (http://www.crashplan.com/). It's great.

16 December 2009

Jasper Reports - Tricks and Tips

In the previous article, we modifed the rights to a set of Jasper Server reports.

To finish this set of articles, here are some tricks and tips.

Tomcat Server

It is possible to display the SQL used, along with its parameters by modifying the logging parameters in Tomcat. You need to modify the file:

C:\Program Files\jasperserver-3.5.0\apache-tomcat\webapps\jasperserver\WEB-INF\log4j.properties

# Global logging configuration
log4j.rootLogger=WARN, stdout, fileout
Change the WARN to DEBUG.

Calculated parameters

You can use calculated parameters. If you uncheck the ‘Use as a prompt’ checkbox, then you can enter an expression in the property Default Value Expression, such as:
"%" + $P{nom} + "%"
This is a JAVA expression.

To do the same thing in the XML view:
<parameter name="name" class="java.lang.String"/>
<parameter name="name_percent" class="java.lang.String" isForPrompting="false">
<defaultValueExpression>
<![CDATA["%" + $P{name} + "%"]]>
</defaultValueExpression>
</parameter>

For example, if you want to use a user-entered string as a LIKE in SQL, you could add ‘%’ at the end of the string:

<parameter name="name" class="java.lang.String"/>
<parameter name="name_percent" class="java.lang.String" isForPrompting="false">
<defaultValueExpression>
<![CDATA[
($P{name} == null) ? "%" : ("" + $P{name} + "%")
]]>
</defaultValueExpression>
</parameter>
<queryString language="SQL">
<![CDATA[
select * from INFORMATION_SCHEMA.TABLES WHERE table_name LIKE $P{name_percent}
]]>
</queryString>

Optional parameters

You can mark a parameter as obligatory or optional. If a parameter is optional, it is possible that the value be NULL in the report (rather than an empty string), so you need to protect all references to the value:

($P{name} == null) ? "%" : ("" + $P{name} + "%")


Also, if you try to dereference a parameter which has a value of null, you will get a NullPointerException, which is internally handled by JasperReports. This will result in a "null" string being displayed in place of the entire expression, or if the expression is part of the SQL select statement, an empty report.

So, for the expression : "front" + $P{name}.toString() + "back", if the value of $P{name} is NULL, then the text that will be displayed will be "null" NOT "frontnullback"

This is the last article in the Jasper Reports series. Hope this has been of use.

Jasper Reports - User rights

In the previous article, we added input parameters to a Jasper Server report.

This time, we'll look at how to modify user access rights to a report or set of reports.

The server administrator can change the rights for the directories and for the reports. They can also change the rights to see the other objects stored on the server, such as the data sources.

For example, for the reports, if you right click on the report on the website, you can select Assign Permissions:

jasper server menu option to change user permissions

Which displays a page where you can modify the permissions by either role or user:

jasper server change user rights

For the directories:

jasper server icon to change the permissions on a directory

Next time we'll look at some tricks and tips for Jasper Server Reports. Next>>

Jasper Reports - Parameterisation of reports

In the previous article, we updated an existing report on a Jasper Server.

This time, we'll look at how to define user-entered parameters for a report.

To define a set of parameters for a report, you can add parameters using the Report Inspector:

jasper reports add parameter to report

You can define the default values for a report. Once you’ve defined a parameter, you can reuse this elsewhere, for example in the SQL for a report:

jasper reports use parameter in query string

You reference the parameters using $P{name}, in this case $P{table_schema}.

Using this, you can filter the output of a report. But to use them, you need to specify how the user enters them. The entry of values isn’t done in the report, but in the Report Unit. You need to define Report Unit Input Controls.

You can define an Input Control so that the user can specify a parameter for a report. For the report defined previously, you could specify a value for the table_schema.
In the Report Unit, create an Input Control:

jasper reports add input control

Enter the Name and Label :

jasper reports enter input control name

The label will be visible to the user. You need to define the details in the tab Input Control Details. For a list of items from the database, use Single Select Query. You can mark the value as mandatory as well here.

jasper reports input control details

To define the SQL statement, click on the Edit Local Resource button:
You'll need to enter a name and label for the local resource (table_schema/table_schema), and then click on the Query tab to define the SQL:

jasper reports define SQL for input control

If you select a data source of 'None', the data source used will be that defined for the Report Unit. In the tab Value and Visible Columns, you need to define the value which will be passed to the report, and the columns visible which will be displayed to the user:

jasper reports input control columns

After deploying to the server, when you run the report the web site will display a input page.

jasper reports show input control on server

And the report displays the information for the table schema chosen.

jasper reports filtered report


Next we'll look at how to modify the user rights for the reports and other objects on Jasper Server. Next>>

Jasper Reports - How to update an existing Jasper Server report

In the previous article, we deployed a report to the Jasper Server.

This time, we'll update an already deployed report.

There are two parts to updating a report deployed to Jasper Server: You can update the properties of the Report Unit, and you can update the report itself. To update the properties of the Report Unit (the name, the description, the data source), you can right-click on the report and select Properties:

Jasper Reports report unit properties

Note that a change to the properties in the Report Unit is available immediately, as soon as you save the changes.

To update the definition of a report, the JRXML file, you need to right-click on the JRXML file for this Report Unit, and select Open in Editor:

jasper reports open jrxml in editor

This creates a temporary jrxml file that you can edit:

jasper reports temporary jrxml file

You can make a modification and then save the file :

jasper reports changed file

This is only saved locally. To deploy these changes to the server, you need to select the jrxml in the navigator and select ‘Replace with current jrxml’. To select this option, you’ll need to be in the Designer tab:

jasper reports replace with current jrxml

This takes the local file and sends it to the server. The report has been updated on the server:

jasper reports updated report

Next, we'll look at adding parameters to the reports. Next>>

06 December 2009

Jasper Reports - How to deploy a report to Jasper Server

In the previous article, we created our first report with iReport.

Here, we're going to deploy it to the server.

First, we need to connect iReport to the repository. Select JasperServer Repository in the Window menu to show the repository navigator:

Select JasperServer Repository

Then click on 'Add new server' to create a new server:

create new server

Enter a name, and the username and password (for the samples jasperadmin/jasperadmin), and save. If we then click on the server in the repository navigator, we get the following:

reports and data sources in the repository

With Jasper, you need to define the data sources for a report. For the preview, the local data source is used, but to display the report from the server, you'll need to define one on the server as well.

In the repository explorer, select the Data sources folder, and right click, select Add->Data Source:

Add new server datasource

Enter a name and a label, and then click on the Data Source Details tab. If you select JDBC data source, you then have the option to 'Import from iReport', where you can select a local data source.


The list of reports in the repository navigator corresponds to the list displayed on the web (see Jasper Reports - Getting Started.)

You can deploy the TABLES report defined in Jasper Reports - Exploring iReport. Now you need to create a Report Unit. A Report Unit is a report plus the data source and any parameters necessary.

We'll create a folder Reports/Test. Then right-click and select Add->Report Unit.

Add Report Unit

The wizard is displayed. Select a name, label and description:

Report Unit enter name, etc.

And the .jrxml file. This is the report1.jrxml containing the report you defined earlier.

Report Unit select datasource

And finally a datasource:

Report Unit select jrxml file

And then the report is available from the web site:

website list of reports including TABLES report

And finally, we can display the report:

TABLES report from the server

Next, we'll look at how to update and redeploy a report to the server. Next>>

05 December 2009

Jasper Reports - Exploring iReport

In the previous article, we explored some of the functionality available with Jasper Reports.

Now, we're going to look at iReport, and how to create a report using iReport. iReport is the easiest method to create and deploy a report to Jasper Reports.

First, we need to create a data source. For our example, we'll use the sample database installed, but you can use any database. First, click on the Report Datasources button to display the local report datasources. Then click on New to create a new datasource:

creation of a new report datasource.

We'll use a Database JDBC Data connection, for the database created when we installed MYSQL. Usually, you would use separate instances for the Jasper admin Database and the data itself, but here we'll keep things simple. We'll use as the datasource the INFORMATION_SCHEMA of the database itself.

Creating a datasource

The default password for root is 'password'.

OK. To create a report from scratch, select File->New->Report Wizard:

iReport selection of Report Wizard

In the wizard, you need to select where the JRXML file will be created, the data source the SQL select statement, the columns from the request to display, and the overall format required. iReport displays the created report. This contains all that is necessary to generate the report.

We'll use 'select TABLE_SCHEMA, TABLE_NAME from INFORMATION_SCHEMA.TABLES', select all of the columns and a 'Classic' tabular format report. This gives us:

First report

And the XML view (where we can see the source):

First report XML view

And the preview (where we can see the potential results). Note that this uses the data source selected at the top of the main window.

First report preview view

Next, we'll deploy a report to Jasper Server, and run it from there. Next>>

26 November 2009

Jasper Reports - Exploring Sample Reports

In the previous article, we set up Jasper Server Reports and were looking at the sample reports that come with the installation.

Here, we'll explore some of the base functionality of Jasper Reports.

Using as an example the Jasper Server Report, we can see that Jasper can do a number of things:

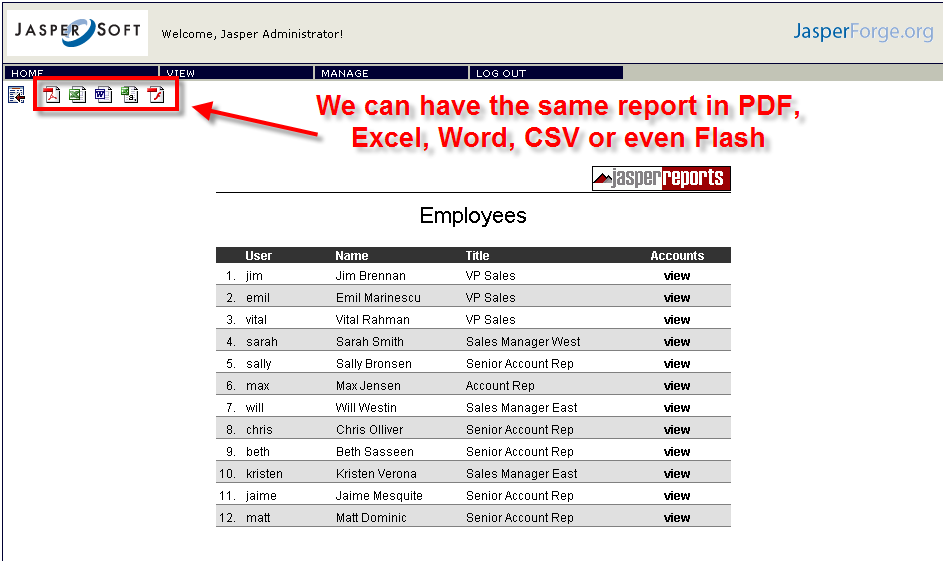
1) Multiple formats for the same report. We only have to write the report once, and the users can display them in a number of formats: PDF, Word, Excel, CSV, Flash and of course HTML:

Employeee list report, different formats available


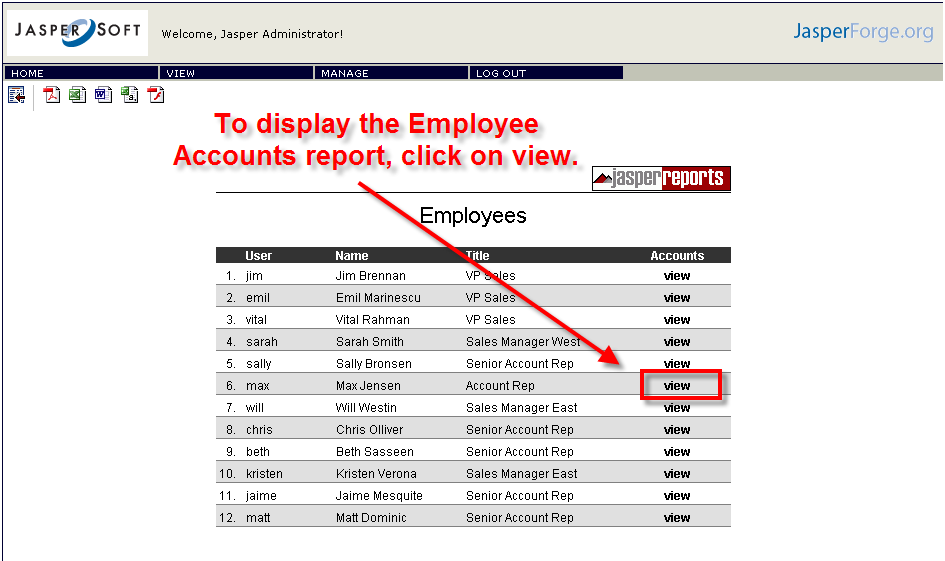
2) Parametered sub-reports are available from a report. The Employee List report contains a link to the Employee Accounts report. The Employee Accounts report requires an employee as a parameter. To display the Employee Accounts report for Max Jensen, you can click on the view link.

Jasper Reports Employee Link to Accounts

The parameter is passed as part of the URL for this report:

http://localhost:8080/jasperserver/flow.html?reportUnit=%2Freports%2Fsamples%2FEmployeeAccounts&EmployeeID=max_id

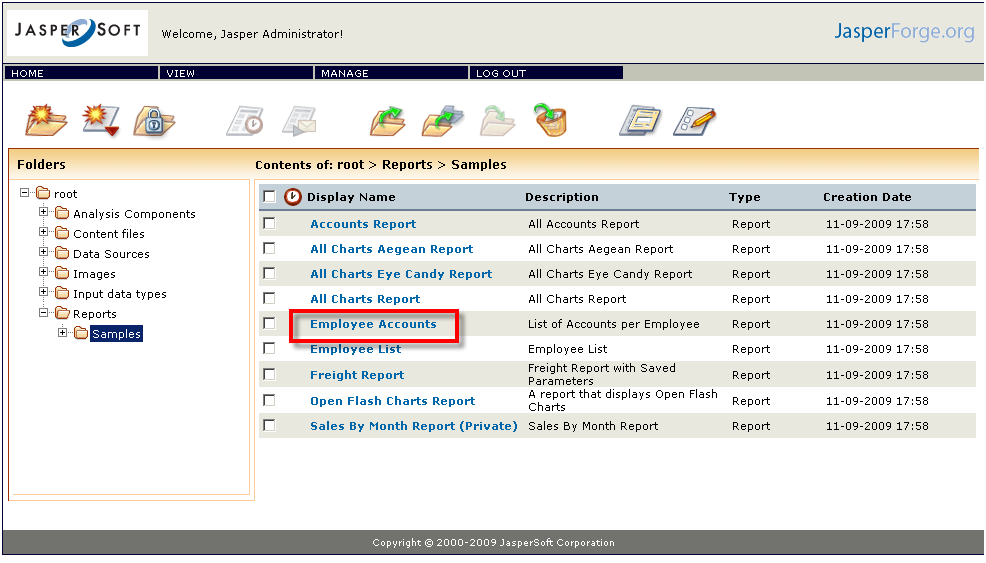
which you can define in the Employee report itself. You can also see that this report is available from the top level list of reports:

Jasper Reports Report List

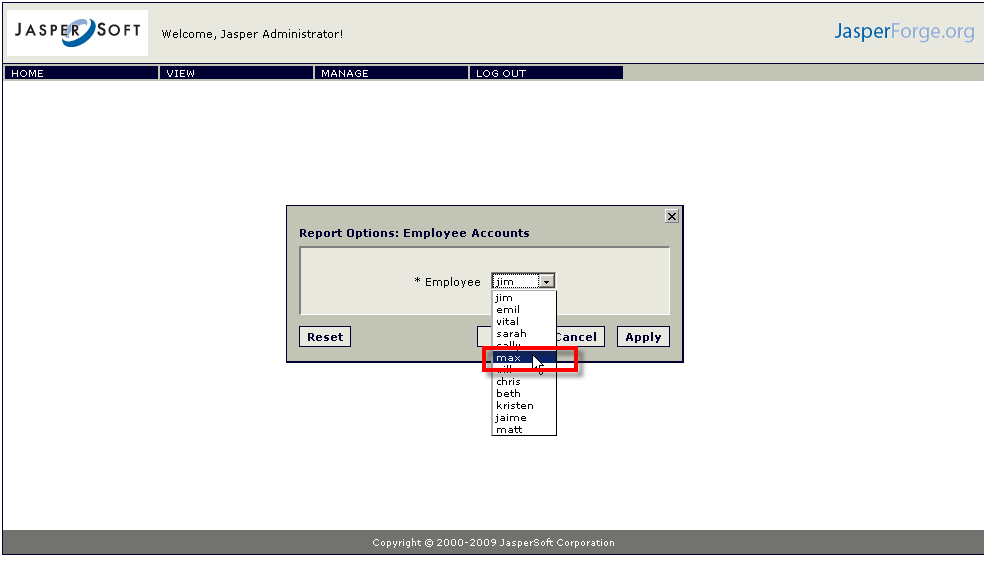
When you click here, you get a list of employees to choose from:

Employee selection

which brings us to the same report that we got when we clicked on the view button in the Employee List:

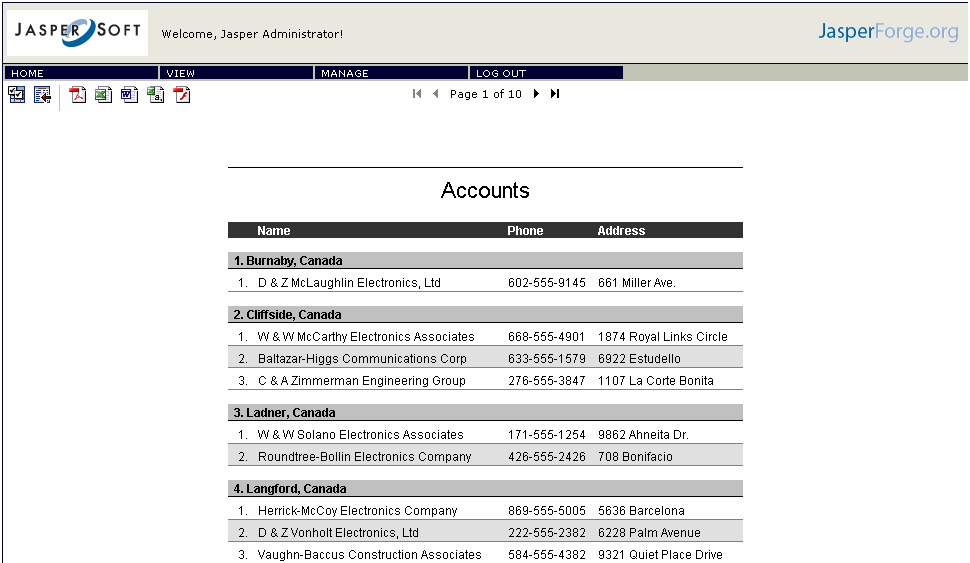
Employee Accounts report

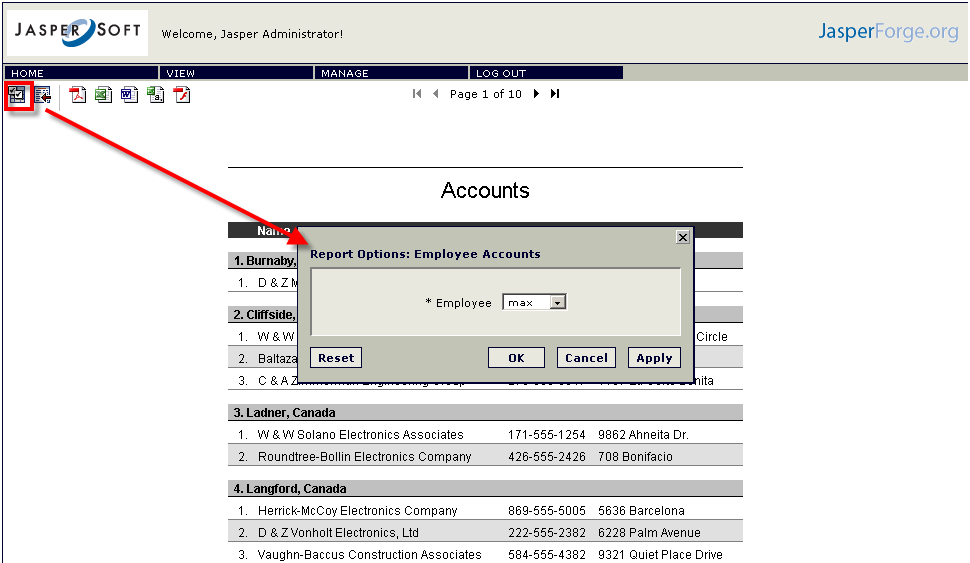
For those reports which require parameters, there is an icon in the top left of the screen to change the parameters:

Select other parameters for the report

Next, we're going to cover iReport, and create and modify some reports. Next>>

24 November 2009

Jasper Reports - Getting Started

I've been exploring the functionality of Jasper Server Reports.

For this, I'm using Jasper Server reports & iReport version 3.5.0. This is available from SourceForge. There is a version for Windows (jasperserver-3.5.0-windows-installer.exe)
and Linux/Solaris/Mac (jasperserver-3.5.0-linux-installer.bin).

We're going to use the windows version.

Once you've downloaded the package, you need to execute it. If you're just evaluating the software, choose the defaults to use the Tomcat, MYSQL and iReport packaged with the executable. If you're evaluating, install the sample reports.

Once you've done that, with Jasper Server started, the web interface is available with http://localhost:8080/jasperserver/login.html.

There are two or three logins already there, jasperadmin/jasperadmin (the administrator) and joeuser/joeuser (an ordinary user).

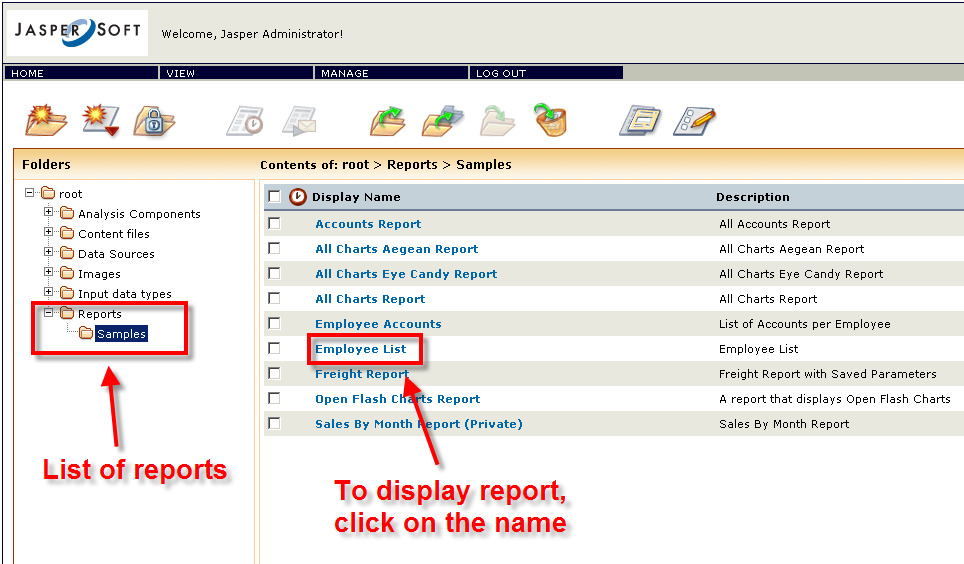
Login as jasperadmin, and then, nn the tree, click on Reports to display the list of reports:

Jasper Server Reports List of reports

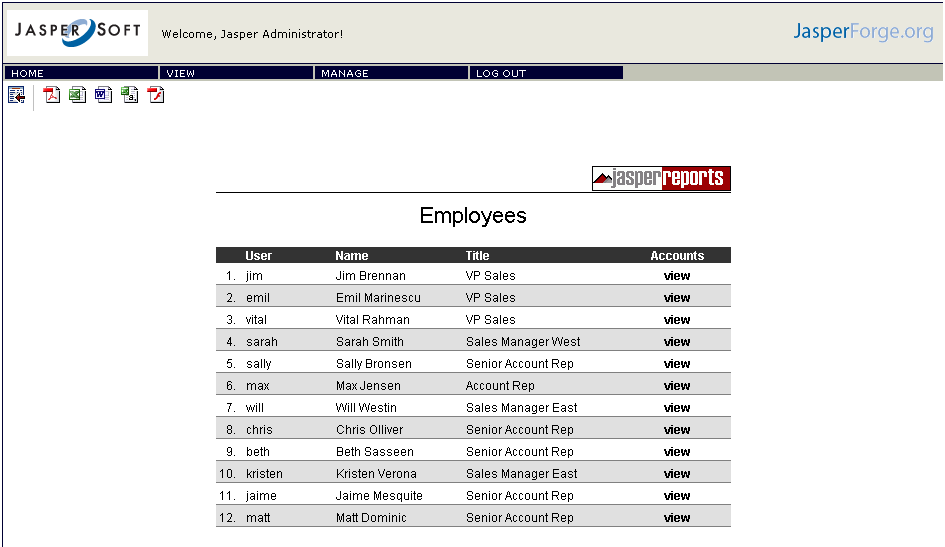
And clicking on one of the reports (Employee List) displays the report in the web page:


Jasper Server Reports Employee List Report

If this is displayed correctly, then Jasper Reports is installed correctly.

We're ready to start exploring the reports themselves Next>>